可 3D 打印的飞翼生成器
围绕大家手头都有的配件设计:推进式 2212 电机、30 A 电调、4S 1500 mAh 锂电(或 3S 2200)、两个 MG90S 舵机和一个小接收机。机翼采用带后掠、梢根比和负扭转的 MH45 级反弯翼型。翼梢小翼提供航向稳定。LW-PLA 翼段是中空蒙皮,由 CAD 中建模的交叉格栅加强,套在碳纤维主梁和连接件上。每个部件都在模型中就位:电池装在卡扣舱盖下的电池舱里;每个舵机拧在 PETG 框架上,框架再拧进机翼下方的槽中,并有线槽通到接收机;电机装在可抽出的尾锥上,方便螺丝刀够到螺丝;电调放在机翼下方通风散热的凹槽里。每个零件都按真实体积和材料计算重量,并与所有部件合计,校验确认电池可以滑到重心位置。每个零件都用它的职责所需的材料打印:看重重量的地方用 LW-PLA;承载发热电机和电调的尾锥、卡扣舱盖和舵机框架用 PETG;薄薄的翼梢小翼用 PLA;柔性铰链用 TPU。点击“使用”可以看到升降副翼的俯仰和滚转动作,装配过程按真实顺序播放。
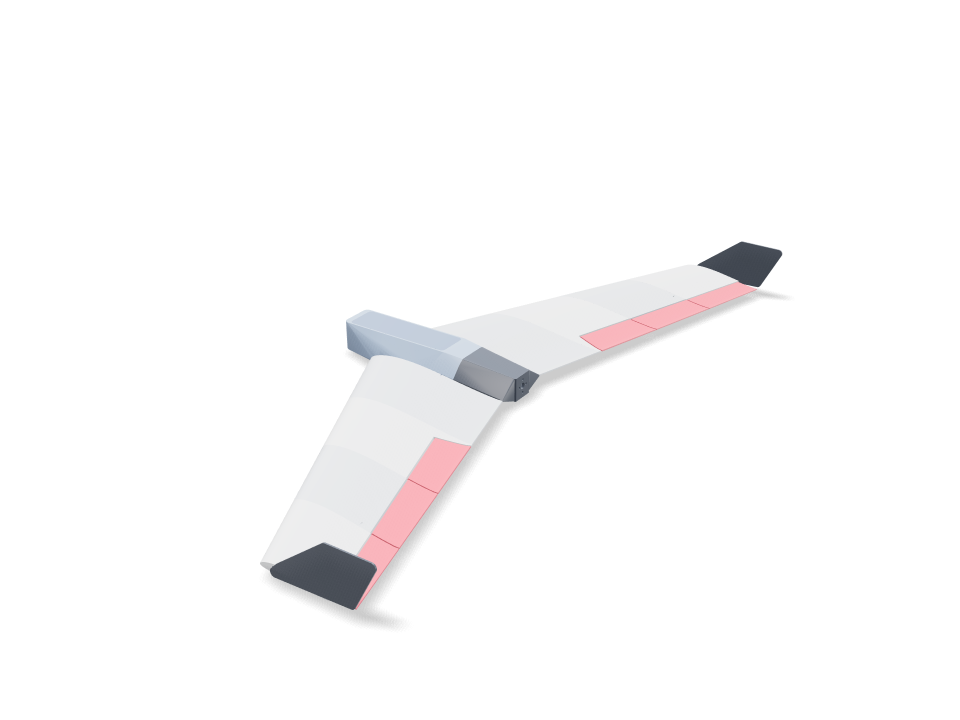
Ask for the sizes you want to tweak, e.g. “make the width adjustable”.
默认尺寸下的规格
在 Bambu Lab A1 上用 PLA 实际构建测得。拖动上方滑块时,每个数字都会实时更新。
- 整体尺寸
- 436 × 994 × 86 mm
- 零件数
- 36
- 耗材
- 427 g
- 打印时间
- 21 h 50 min
- 打印盘
- 3
- 支撑
- 部分零件需要
工程校验
校验和参数名称直接来自 CAD 引擎,以英文显示。
- Modeled lattice in panel 1 R13342.5 mm3 of internal CAD material; not slicer infill or a strength qualification
- Modeled lattice in panel 2 R11146.3 mm3 of internal CAD material; not slicer infill or a strength qualification
- Modeled lattice in elevon 2 RInterior webs remain after the control-surface crop; physical stiffness is unverified
- Modeled lattice in panel 3 R9231.5 mm3 of internal CAD material; not slicer infill or a strength qualification
- Modeled lattice in elevon 3 RInterior webs remain after the control-surface crop; physical stiffness is unverified
- Modeled lattice in panel 4 R6908.2 mm3 of internal CAD material; not slicer infill or a strength qualification
- Modeled lattice in elevon 4 RInterior webs remain after the control-surface crop; physical stiffness is unverified
- Modeled lattice in panel 1 L13342.5 mm3 of internal CAD material; not slicer infill or a strength qualification
- Modeled lattice in panel 2 L11146.3 mm3 of internal CAD material; not slicer infill or a strength qualification
- Modeled lattice in elevon 2 LInterior webs remain after the control-surface crop; physical stiffness is unverified
- Modeled lattice in panel 3 L9231.5 mm3 of internal CAD material; not slicer infill or a strength qualification
- Modeled lattice in elevon 3 LInterior webs remain after the control-surface crop; physical stiffness is unverified
- Modeled lattice in panel 4 L6908.2 mm3 of internal CAD material; not slicer infill or a strength qualification
- Modeled lattice in elevon 4 LInterior webs remain after the control-surface crop; physical stiffness is unverified
- Battery trims the balance pointbalance at 18% MAC = 128 mm behind the root LE (static margin ~7% to a ~25% MAC neutral point); the battery reaches it with its front -35 mm behind the root LE (trim range 123-134 mm)
- Hatch snaps without cracking0.75% peak strain in a 12 mm PETG arm over a 0.6 mm hook (keep under half of PETG's 10% elongation)
- Wing loading ≤ 45 g/dm²44.8 g/dm² at 794 g all-up (printed parts 452 g from their volumes; 4S 1500 175 g)
- Stall speed ≤ 10 m/s (CL 0.8)9.5 m/s — hand-launchable
- Thrust for a hand launchthrust/weight 1.13 with 900 g static thrust (typical of a 2212 ~1000 KV on 4S with an 8x4.5 prop; read your motor's chart and set it)
- Winglets give yaw stabilitytwo tip plates, 7.0% of the wing area
- Elevons have authority16% of the wing area, ±15 deg throw on TPU hinges
- Pushrods run clear under the wing1.2 mm wire from each servo horn to its control horn, straight and level
- Linkage gives the full elevon throwcontrol horn 15.4 mm under the hinge line, servo horn 16 mm: +/-15 deg of elevon needs +/-14 deg of servo travel (under 45)
- TPU hinges bend within TPU's range21% peak bending strain in the 0.8 mm strip at +/-15 deg, bending across a 0.5 mm gap on the pivot line (keep under a tenth of TPU's 400%)
- Winglet pegs fit the tip airfoiltip airfoil 11.6 mm thick at the pegs for 5 mm square pegs (1.2 mm wall each side)
- Servos screwed down, not gluedeach MG90S: two M2 tab screws into 6 mm PETG ears (2 x screw diameter of thread), frame held by two M2 screws into heat-set inserts in wing columns
- Servos fit under the top skinMG90S (catalog proxy) on its side in a pocket opening under the wing; at least 1 mm of top skin left above it
- Servo plugs pass the wire channel10.2 mm channel from each servo to the receiver bay for a 8 x 4.2 mm plug
- Prop clears the trailing edge22 mm between the 8 inch prop and the nearest trailing edge; use a folding prop or land on grass (a pusher prop sits below the belly)
- receiver goes in30 poses along its path clear of every part.
- servo lead R goes in87 poses along its path clear of every part.
- servo lead L goes in87 poses along its path clear of every part.
- ESC goes in15 poses along its path clear of every part.
- 2212 motor + 8x4.5 prop goes in20 poses along its path clear of every part.
- driver: motor screws (bench) goes in30 poses along its path clear of every part.
- driver: tail cone screws goes in20 poses along its path clear of every part.
- MG90S servos goes in20 poses along its path clear of every part.
- MG90S onto its frame (bench) R goes in15 poses along its path clear of every part.
- driver: servo tab screws (bench) R goes in20 poses along its path clear of every part.
- MG90S onto its frame (bench) L goes in15 poses along its path clear of every part.
- driver: servo tab screws (bench) L goes in20 poses along its path clear of every part.
- driver: servo frame screws goes in20 poses along its path clear of every part.
- carbon joiner 8 mm goes in125 poses along its path clear of every part.
- carbon spar R goes in245 poses along its path clear of every part.
- carbon spar L goes in245 poses along its path clear of every part.
- battery goes in30 poses along its path clear of every part.
可调尺寸
| 设置 | 默认 | 范围 |
|---|---|---|
| Half-span (per wing) | 450 mm | 250–500 mm |
| Root chord | 220 mm | 140–240 mm |
| Tip chord | 130 mm | 80–180 mm |
| LE sweep | 25 ° | 15–35 ° |
| Washout | 3 ° | 0–5 ° |
| Skin thickness | 0.9 mm | 0.6–1.6 mm |
| Lattice web thickness | 1 mm | 1–2 mm |
| Diagonal lattice pitch | 60 mm | 30–90 mm |
| Panels per wing | 4 | 2–6 |
| Carbon spar OD | 8 mm | 5–10 mm |
| Battery | 4S 1500 | — |
| Motor static thrust (from its chart) | 900 g | 400–1600 g |
零件清单
| 零件 | 数量 | 尺寸(mm) | 耗材 | 时间 |
|---|---|---|---|---|
| centre-section | 1 | 129 × 45 × 90 | 32 g | 1 h 36 min |
| nose | 1 | 44 × 90 × 77 | 17 g | 54 min |
| tail cone | 1 | 43 × 90 × 93 | 43 g | 1 h 8 min |
| hatch | 1 | 162 × 47 × 14 | 16 g | 25 min |
| servo frame R | 1 | 47 × 24 × 14 | 2 g | 8 min |
| panel-1-R | 1 | 250 × 23 × 113 | 42 g | 2 h 3 min |
| panel-2-R | 1 | 198 × 21 × 113 | 31 g | 1 h 34 min |
| elevon-2-R | 1 | 75 × 10 × 108 | 7 g | 32 min |
| control horn R | 1 | 21 × 16 × 2 | 0 g | 5 min |
| panel-3-R | 1 | 165 × 20 × 113 | 27 g | 1 h 24 min |
| elevon-3-R | 1 | 75 × 9 × 111 | 7 g | 32 min |
| panel-4-R | 1 | 148 × 18 × 113 | 23 g | 1 h 14 min |
| elevon-4-R | 1 | 68 × 8 × 108 | 5 g | 29 min |
| servo frame L | 1 | 47 × 24 × 14 | 2 g | 8 min |
| panel-1-L | 1 | 250 × 23 × 113 | 42 g | 2 h 3 min |
| panel-2-L | 1 | 198 × 21 × 113 | 31 g | 1 h 34 min |
| elevon-2-L | 1 | 75 × 10 × 108 | 7 g | 32 min |
| control horn L | 1 | 21 × 16 × 2 | 0 g | 5 min |
| panel-3-L | 1 | 165 × 20 × 113 | 27 g | 1 h 24 min |
| elevon-3-L | 1 | 75 × 9 × 111 | 7 g | 32 min |
| panel-4-L | 1 | 148 × 18 × 113 | 23 g | 1 h 14 min |
| elevon-4-L | 1 | 68 × 8 × 108 | 5 g | 29 min |
| winglet-R | 1 | 145 × 72 × 8 | 15 g | 24 min |
| winglet-L | 1 | 145 × 72 × 8 | 15 g | 24 min |
| hinge strip (TPU) | 12 | 22 × 24 × 1 | 0 g | 5 min |
制作方法
- 选好打印机,然后设置翼展、翼弦和后掠角。拖动时重心、翼载荷、失速速度和推力校验都会重新计算。
- 从电机数据表输入静推力,并选择电池。
- 翼段、升降副翼、中段和机头用 LW-PLA 打印;尾锥、舱盖和舵机框架用 PETG;翼梢小翼用 PLA;铰链条用 TPU。
- 把翼段粘在碳纤维主梁和连接件上,用 1.75 mm 耗材当定位销。粘上机头。每个翼梢小翼有两个方榫:在翼梢肋对应的榫孔里滴一滴胶,按到底。
- 铰链:每个铰链面在壁中间有两个薄槽。在机翼槽和升降副翼槽里各滴一滴快干胶,把 TPU 条插进机翼一半,再把升降副翼套上去,胶水固化前保持 0.5 mm 缝隙。TPU 条会像门铰链一样在缝隙中弯曲。
- 连杆:把每个 PETG 舵角粘进升降副翼下方的槽里,舵机摇臂朝下装好,用两端做 Z 弯的 1.2 mm 钢丝连接。舵角孔位于铰链线下方,所以上下舵量相同。
- 在工作台上把每个舵机的耳片拧到 PETG 框架上,再把框架连舵机从下方装进槽里,用两颗 M2 螺丝向上拧入熔进机翼立柱的热熔螺母。把线从线槽穿进舵机舱。
- 用长螺丝刀从敞开的前端把电机拧到尾锥上,在尾锥的舌片里熔入两颗 M3 热熔螺母,推入机身,从下方拧上两颗 M3 螺丝。
- 按下舱盖直到两侧都咔哒一声,再把电池推到重心校验给出的位置。
打印建议
- LW-PLA 在 230–250 °C 会发泡,重量约减半——先校准流量。
- 翼段以翼根肋为底直立打印,填充设为 0%:内部格栅已经建模在零件里,切片软件会把它当作壁来打印。
- TPU 铰链条平放慢速打印;0.8 mm 厚时很容易弯,也不会撕裂。
- 碳管保持滑动配合:孔径建模时比碳管外径大 0.3 mm。
常见问题
真的能飞吗?
它就是按能飞来设计的:电池可以让重心落在平均气动弦长的 18%(静稳定裕度 7%),翼载荷、失速速度、推重比、翼梢小翼面积和升降副翼面积都经过校验。这些是设计校验,不是飞行测试。请在标记点用指尖托平衡,检查升降副翼的动作方向,首飞时顶风轻轻推出。
适配哪些电子设备?
带 8x4.5 桨的 2212 电机(约 1000 KV)、30 A 电调、4S 1500 mAh 或 3S 2200 mAh 锂电、两个 MG90S 舵机,以及任意小型接收机。请确认你的 2212 支持 4S 和这支桨,并从电机数据表输入静推力。
TPU 铰链怎么工作?
每个升降副翼通过两条薄 TPU 条与机翼相连,TPU 条横跨缝隙粘在上表面。TPU 能弯不会裂,所以就像门铰链一样。缝隙下方是 V 形,升降副翼既能上偏也能下偏。
降落怎么办?
螺旋桨是推进式的,位于机腹下方。用折叠桨或者降落在草地上,触地前收油门。
Comments