3D 프린팅 비행익 생성기
누구나 이미 가진 부품을 기준으로 만들었어요. 푸셔 방식의 2212 모터, 30A ESC, 4S 1500mAh LiPo(또는 3S 2200), MG90S 서보 두 개, 작은 수신기. 날개는 후퇴각, 테이퍼, 워시아웃을 준 MH45급 리플렉스 익형이에요. 날개 끝의 윙렛이 요 안정성을 줘요. LW-PLA 패널은 CAD에서 모델링한 교차 격자로 보강한 속이 빈 외피이고, 카본 스파와 조이너에 끼워져요. 모든 부품이 모델 안에 배치돼 있어요. 배터리는 스냅식 해치 아래 포드에, 각 서보는 날개 아래 포켓에 나사로 고정하는 PETG 프레임에, 수신기까지 배선 채널이 이어지고, 모터는 드라이버가 나사에 닿도록 빼낼 수 있는 테일 콘에, ESC는 바람이 식혀 주는 날개 아래 홈에 들어가요. 각 부품은 실제 부피와 소재로 무게를 계산하고, 모든 구성 요소와 합쳐 배터리를 무게중심까지 밀 수 있는지 검사해요. 각 부품은 역할에 맞는 소재로 출력해요. 무게가 중요한 곳은 LW-PLA, 뜨거운 모터와 ESC를 받치는 테일 콘·스냅 해치·서보 프레임은 PETG, 얇은 윙렛은 PLA, 유연한 힌지는 TPU. '사용'을 누르면 피치와 롤로 움직이는 엘레본을 볼 수 있고, 조립은 실제 순서대로 재생돼요.
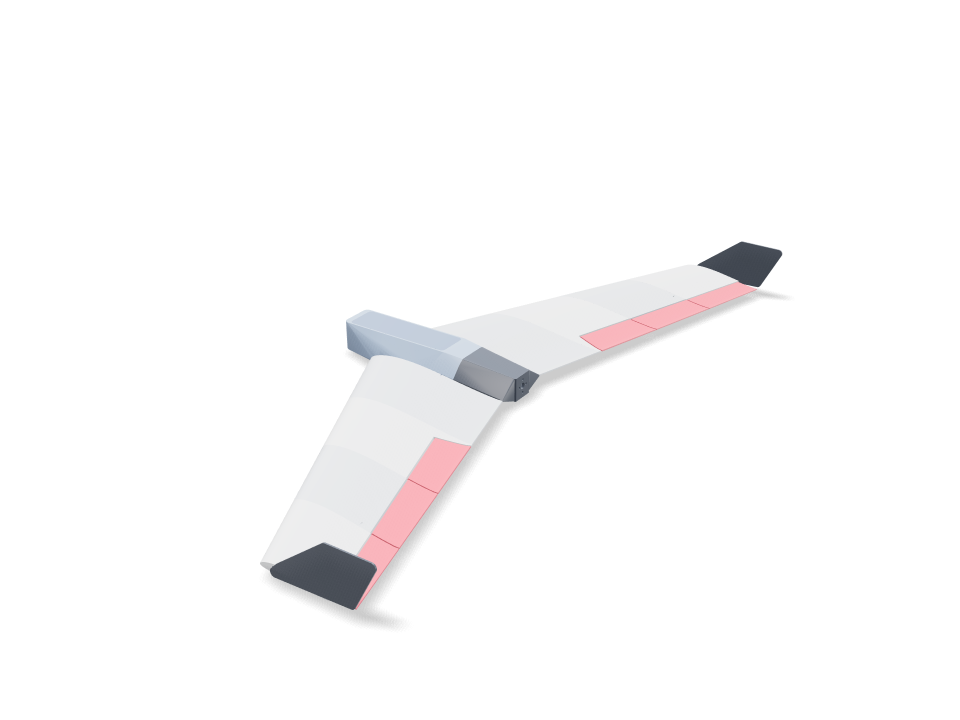
Ask for the sizes you want to tweak, e.g. “make the width adjustable”.
기본 크기 사양
Bambu Lab A1에서 PLA로 실제 빌드해 측정했어요. 위 슬라이더를 움직이면 모든 숫자가 실시간으로 바뀌어요.
- 전체 크기
- 436 × 994 × 86 mm
- 부품 수
- 36
- 필라멘트
- 427 g
- 출력 시간
- 21 h 50 min
- 빌드 플레이트
- 3
- 서포트
- 일부 부품
공학 검사
검사 이름과 파라미터 이름은 CAD 엔진에서 그대로 나오기 때문에 영어로 표시돼요.
- Modeled lattice in panel 1 R13342.5 mm3 of internal CAD material; not slicer infill or a strength qualification
- Modeled lattice in panel 2 R11146.3 mm3 of internal CAD material; not slicer infill or a strength qualification
- Modeled lattice in elevon 2 RInterior webs remain after the control-surface crop; physical stiffness is unverified
- Modeled lattice in panel 3 R9231.5 mm3 of internal CAD material; not slicer infill or a strength qualification
- Modeled lattice in elevon 3 RInterior webs remain after the control-surface crop; physical stiffness is unverified
- Modeled lattice in panel 4 R6908.2 mm3 of internal CAD material; not slicer infill or a strength qualification
- Modeled lattice in elevon 4 RInterior webs remain after the control-surface crop; physical stiffness is unverified
- Modeled lattice in panel 1 L13342.5 mm3 of internal CAD material; not slicer infill or a strength qualification
- Modeled lattice in panel 2 L11146.3 mm3 of internal CAD material; not slicer infill or a strength qualification
- Modeled lattice in elevon 2 LInterior webs remain after the control-surface crop; physical stiffness is unverified
- Modeled lattice in panel 3 L9231.5 mm3 of internal CAD material; not slicer infill or a strength qualification
- Modeled lattice in elevon 3 LInterior webs remain after the control-surface crop; physical stiffness is unverified
- Modeled lattice in panel 4 L6908.2 mm3 of internal CAD material; not slicer infill or a strength qualification
- Modeled lattice in elevon 4 LInterior webs remain after the control-surface crop; physical stiffness is unverified
- Battery trims the balance pointbalance at 18% MAC = 128 mm behind the root LE (static margin ~7% to a ~25% MAC neutral point); the battery reaches it with its front -35 mm behind the root LE (trim range 123-134 mm)
- Hatch snaps without cracking0.75% peak strain in a 12 mm PETG arm over a 0.6 mm hook (keep under half of PETG's 10% elongation)
- Wing loading ≤ 45 g/dm²44.8 g/dm² at 794 g all-up (printed parts 452 g from their volumes; 4S 1500 175 g)
- Stall speed ≤ 10 m/s (CL 0.8)9.5 m/s — hand-launchable
- Thrust for a hand launchthrust/weight 1.13 with 900 g static thrust (typical of a 2212 ~1000 KV on 4S with an 8x4.5 prop; read your motor's chart and set it)
- Winglets give yaw stabilitytwo tip plates, 7.0% of the wing area
- Elevons have authority16% of the wing area, ±15 deg throw on TPU hinges
- Pushrods run clear under the wing1.2 mm wire from each servo horn to its control horn, straight and level
- Linkage gives the full elevon throwcontrol horn 15.4 mm under the hinge line, servo horn 16 mm: +/-15 deg of elevon needs +/-14 deg of servo travel (under 45)
- TPU hinges bend within TPU's range21% peak bending strain in the 0.8 mm strip at +/-15 deg, bending across a 0.5 mm gap on the pivot line (keep under a tenth of TPU's 400%)
- Winglet pegs fit the tip airfoiltip airfoil 11.6 mm thick at the pegs for 5 mm square pegs (1.2 mm wall each side)
- Servos screwed down, not gluedeach MG90S: two M2 tab screws into 6 mm PETG ears (2 x screw diameter of thread), frame held by two M2 screws into heat-set inserts in wing columns
- Servos fit under the top skinMG90S (catalog proxy) on its side in a pocket opening under the wing; at least 1 mm of top skin left above it
- Servo plugs pass the wire channel10.2 mm channel from each servo to the receiver bay for a 8 x 4.2 mm plug
- Prop clears the trailing edge22 mm between the 8 inch prop and the nearest trailing edge; use a folding prop or land on grass (a pusher prop sits below the belly)
- receiver goes in30 poses along its path clear of every part.
- servo lead R goes in87 poses along its path clear of every part.
- servo lead L goes in87 poses along its path clear of every part.
- ESC goes in15 poses along its path clear of every part.
- 2212 motor + 8x4.5 prop goes in20 poses along its path clear of every part.
- driver: motor screws (bench) goes in30 poses along its path clear of every part.
- driver: tail cone screws goes in20 poses along its path clear of every part.
- MG90S servos goes in20 poses along its path clear of every part.
- MG90S onto its frame (bench) R goes in15 poses along its path clear of every part.
- driver: servo tab screws (bench) R goes in20 poses along its path clear of every part.
- MG90S onto its frame (bench) L goes in15 poses along its path clear of every part.
- driver: servo tab screws (bench) L goes in20 poses along its path clear of every part.
- driver: servo frame screws goes in20 poses along its path clear of every part.
- carbon joiner 8 mm goes in125 poses along its path clear of every part.
- carbon spar R goes in245 poses along its path clear of every part.
- carbon spar L goes in245 poses along its path clear of every part.
- battery goes in30 poses along its path clear of every part.
조절 가능한 치수
| 설정 | 기본값 | 범위 |
|---|---|---|
| Half-span (per wing) | 450 mm | 250–500 mm |
| Root chord | 220 mm | 140–240 mm |
| Tip chord | 130 mm | 80–180 mm |
| LE sweep | 25 ° | 15–35 ° |
| Washout | 3 ° | 0–5 ° |
| Skin thickness | 0.9 mm | 0.6–1.6 mm |
| Lattice web thickness | 1 mm | 1–2 mm |
| Diagonal lattice pitch | 60 mm | 30–90 mm |
| Panels per wing | 4 | 2–6 |
| Carbon spar OD | 8 mm | 5–10 mm |
| Battery | 4S 1500 | — |
| Motor static thrust (from its chart) | 900 g | 400–1600 g |
부품 목록
| 부품 | 수량 | 크기(mm) | 필라멘트 | 시간 |
|---|---|---|---|---|
| centre-section | 1 | 129 × 45 × 90 | 32 g | 1 h 36 min |
| nose | 1 | 44 × 90 × 77 | 17 g | 54 min |
| tail cone | 1 | 43 × 90 × 93 | 43 g | 1 h 8 min |
| hatch | 1 | 162 × 47 × 14 | 16 g | 25 min |
| servo frame R | 1 | 47 × 24 × 14 | 2 g | 8 min |
| panel-1-R | 1 | 250 × 23 × 113 | 42 g | 2 h 3 min |
| panel-2-R | 1 | 198 × 21 × 113 | 31 g | 1 h 34 min |
| elevon-2-R | 1 | 75 × 10 × 108 | 7 g | 32 min |
| control horn R | 1 | 21 × 16 × 2 | 0 g | 5 min |
| panel-3-R | 1 | 165 × 20 × 113 | 27 g | 1 h 24 min |
| elevon-3-R | 1 | 75 × 9 × 111 | 7 g | 32 min |
| panel-4-R | 1 | 148 × 18 × 113 | 23 g | 1 h 14 min |
| elevon-4-R | 1 | 68 × 8 × 108 | 5 g | 29 min |
| servo frame L | 1 | 47 × 24 × 14 | 2 g | 8 min |
| panel-1-L | 1 | 250 × 23 × 113 | 42 g | 2 h 3 min |
| panel-2-L | 1 | 198 × 21 × 113 | 31 g | 1 h 34 min |
| elevon-2-L | 1 | 75 × 10 × 108 | 7 g | 32 min |
| control horn L | 1 | 21 × 16 × 2 | 0 g | 5 min |
| panel-3-L | 1 | 165 × 20 × 113 | 27 g | 1 h 24 min |
| elevon-3-L | 1 | 75 × 9 × 111 | 7 g | 32 min |
| panel-4-L | 1 | 148 × 18 × 113 | 23 g | 1 h 14 min |
| elevon-4-L | 1 | 68 × 8 × 108 | 5 g | 29 min |
| winglet-R | 1 | 145 × 72 × 8 | 15 g | 24 min |
| winglet-L | 1 | 145 × 72 × 8 | 15 g | 24 min |
| hinge strip (TPU) | 12 | 22 × 24 × 1 | 0 g | 5 min |
만드는 법
- 프린터를 고르고 날개폭, 시위, 후퇴각을 설정하세요. 무게중심, 익면하중, 실속 속도, 추력 검사가 드래그할 때마다 다시 실행돼요.
- 모터 데이터표에서 정지 추력을 입력하고 배터리를 고르세요.
- 패널, 엘레본, 센터, 노즈는 LW-PLA로, 테일 콘, 해치, 서보 프레임은 PETG로, 윙렛은 PLA로, 힌지 스트립은 TPU로 출력하세요.
- 1.75mm 필라멘트를 정렬 핀으로 삼아 패널을 카본 스파와 조이너에 붙이세요. 노즈를 붙이세요. 윙렛마다 사각 돌기가 두 개 있어요. 날개 끝 리브의 맞는 포켓에 접착제를 한 방울 넣고 끝까지 눌러 넣으세요.
- 힌지: 각 힌지 면의 벽 가운데에 얇은 포켓이 두 개 있어요. 날개 포켓과 엘레본 포켓에 순간접착제를 한 방울씩 넣고, TPU 스트립을 날개에 반쯤 밀어 넣은 뒤 엘레본을 그 위로 밀어 끼우고, 굳을 때까지 0.5mm 간격을 유지하세요. 스트립이 간격 안에서 문 경첩처럼 휘어요.
- 링키지: PETG 컨트롤 혼을 각 엘레본 아래 슬롯에 붙이고, 서보 혼을 아래로 향하게 끼운 뒤, 양 끝을 Z벤드한 1.2mm 와이어로 연결하세요. 혼 구멍이 힌지 선 아래에 있어서 위아래 타각이 같아요.
- 작업대에서 각 서보의 귀를 PETG 프레임에 나사로 고정한 뒤, 프레임과 서보를 아래에서 포켓에 넣고 날개 기둥에 박은 열압입 인서트에 M2 나사 두 개를 아래에서 조이세요. 배선을 채널로 베이까지 넣으세요.
- 긴 드라이버로 열린 앞쪽을 통해 모터를 테일 콘에 고정하고, 콘의 혀 부분에 M3 인서트 두 개를 박은 뒤 동체에 밀어 넣고 아래에서 M3 나사 두 개를 조이세요.
- 해치를 양쪽이 딸깍할 때까지 누르고, 무게중심 검사의 위치가 될 때까지 배터리를 미세요.
출력 팁
- LW-PLA는 230~250°C에서 발포해 무게가 약 절반이 돼요. 먼저 유량을 보정하세요.
- 패널은 뿌리 리브를 아래로 세워 인필 0%로 출력하세요. 내부 격자가 이미 부품에 모델링되어 있어 슬라이서가 벽으로 출력해요.
- TPU 힌지 스트립은 눕혀서 천천히 출력하세요. 두께 0.8mm면 잘 휘고 찢어지지 않아요.
- 카본 튜브는 미끄럼 끼워맞춤으로 두세요. 구멍은 튜브 외경보다 0.3mm 크게 모델링되어 있어요.
자주 묻는 질문
정말 날까요?
날도록 설계했어요. 배터리로 평균 시위의 18%(정안정 여유 7%)에 무게중심을 맞출 수 있고, 익면하중, 실속 속도, 추력 대 중량비, 윙렛 면적, 엘레본 면적을 검사해요. 설계 검사일 뿐 비행 시험은 아니에요. 표시된 지점을 손끝에 올려 균형을 맞추고, 엘레본이 올바른 방향으로 움직이는지 확인한 뒤, 첫 비행은 바람을 향해 부드럽게 던지세요.
어떤 전장품이 맞나요?
8x4.5 프로펠러를 단 2212 모터(약 1000KV), 30A ESC, 4S 1500mAh 또는 3S 2200mAh LiPo, MG90S 서보 두 개, 그리고 작은 수신기면 무엇이든요. 가진 2212가 4S와 그 프로펠러를 감당하는지 확인하고, 모터 데이터표의 정지 추력을 입력하세요.
TPU 힌지는 어떻게 작동하나요?
각 엘레본은 간격 위쪽을 가로질러 붙인 얇은 TPU 스트립 두 개로 날개에 붙어 있어요. TPU는 휘어도 갈라지지 않아서 스트립이 문 경첩처럼 작동해요. 간격 아래쪽은 V자라서 엘레본이 위만큼 아래로도 움직여요.
착륙은요?
프로펠러는 푸셔 방식이고 배 아래에 있어요. 접이식 프로펠러를 쓰거나 잔디에 착륙하고, 닿기 전에 스로틀을 끄세요.
Comments