How to split a model that’s too big for your 3D printer
Sooner or later the thing you want is bigger than the bed you own. Cutting it is easy. Cutting it so the pieces line up, hide the seam and survive the load takes a little planning, and most of it happens before you open the slicer.
Short answer
Cut on a flat face where the seam is hidden and where the part carries the least load, keep every piece a few millimetres inside your printer’s build volume, and add alignment pins. A 1.9 mm hole about 8 mm deep in each half takes a piece of 1.75 mm filament as a free, perfectly sized dowel. Bambu Studio, OrcaSlicer and PrusaSlicer can cut and add connectors themselves; for load-bearing joints, design the cut in CAD instead. Glue PLA with cyanoacrylate or epoxy, and PETG with epoxy.
The model is 300 mm long. Your bed is 256. The slicer paints the part grey and refuses. You could buy a bigger printer, or you could do what people who print helmets, cosplay armour and RC planes do every day: cut it into pieces that fit, and put them back together so well nobody can find the seam.
The cut takes a minute. The thinking before the cut is what makes it good, so that is where this guide spends most of its time.
Does it really not fit?
Before you cut anything, check the obvious alternatives:
- Rotate it. A long part laid diagonally gains about 40% of length on a square bed. A part stood upright uses the height, which is often the largest dimension.
- Compare against the real build volume, not the marketing bed size. Keep a few millimetres from every edge for the brim and the purge line.
| Printer | Build volume | Diagonal on the bed |
|---|---|---|
| Bambu Lab A1 | 256 × 256 × 256 mm | 362 mm |
| Bambu Lab P1S | 256 × 256 × 256 mm | 362 mm |
| Bambu Lab A1 mini | 180 × 180 × 180 mm | 255 mm |
| Bambu Lab X1 Carbon | 256 × 256 × 256 mm | 362 mm |
| Bambu Lab H2D | 300 × 320 × 325 mm | 439 mm |
| Bambu Lab H2D Pro | 300 × 320 × 325 mm | 439 mm |
| Bambu Lab H2C | 300 × 320 × 325 mm | 439 mm |
| Bambu Lab H2S | 340 × 320 × 340 mm | 467 mm |
| Bambu Lab X2D | 235.5 × 256 × 256 mm | 348 mm |
| Bambu Lab P2S | 256 × 256 × 256 mm | 362 mm |
| Bambu Lab A2L | 330 × 320 × 325 mm | 460 mm |
| Bambu Lab P1P | 256 × 256 × 256 mm | 362 mm |
| Bambu Lab X1 | 256 × 256 × 256 mm | 362 mm |
| Bambu Lab X1E | 256 × 256 × 256 mm | 362 mm |
| Prusa MK4S | 250 × 210 × 220 mm | 326 mm |
| Prusa CORE One | 250 × 220 × 270 mm | 333 mm |
| Creality K1 / K1C | 220 × 220 × 250 mm | 311 mm |
| Creality Ender-3 V3 | 220 × 220 × 250 mm | 311 mm |
| Voron 2.4 (350) | 350 × 350 × 340 mm | 495 mm |
Where to cut
A good cut line does four jobs at once. It sits:
- On a flat face or a natural edge, where a seam looks designed rather than accidental: a change of shape, a groove, a panel line.
- Where the load is lowest. A glued seam is weaker than solid plastic. Don’t cut a bracket at its root or a handle at its middle.
- So both pieces print well. Each new piece needs a flat face to sit on and should need as little support as possible. Often the cut face itself becomes the bed face.
- With room for pins. The cut face must be big enough to hold at least two alignment pins with a few millimetres of wall around each.
Fewer, larger pieces beat many small ones: every joint adds a seam to hide and a little error to the whole. But don’t stretch a piece to the very edge of the bed just to save a cut.
Pins, dowels and keys
Glue alone lets two faces slide as they set, and you end up with a step at the seam. Something has to hold them in register.
Filament dowels
The cheapest dowel is already on your printer. Model a 1.9 mm hole about 8 mm deep in each face, at the same positions, and push in a 15 mm length of 1.75 mm filament. It is always the right size, costs nothing, and gives about 0.15 mm of clearance for glue. Use at least two pins per joint so the pieces can’t rotate, and space them as far apart as the face allows.
Printed pins and keys
For bigger joints, print separate pins (5–8 mm diameter) or a key that bridges both halves, with a snug clearance of about 0.2 mm total. A key with a D-shape or a rectangle can only go in one way, which is handy when a part has several similar seams.
Joints that hold without glue
A dovetail or tongue-and-groove holds the pieces mechanically and survives more load than a butt joint. Give the sliding faces about 0.2–0.3 mm total clearance, and print both pieces so the joint’s long axis is parallel to the bed, or it will snap along a layer. The tolerance guide covers the clearances in detail.
Cutting in the slicer
For decorative parts, the slicer’s cut tool is quick and good. Bambu Studio, OrcaSlicer and PrusaSlicer all have one, and all can add connectors as they cut:
- Select the model and open the Cut tool (the shortcut is C in all three).
- Drag or type the cut plane’s position, and rotate it if needed.
- Add connectors: plugs (a peg on one side, a hole on the other) or dowels (holes on both sides for a separate pin). Place at least two.
- Choose how each half should sit on the plate, then cut.
Connector tolerance is adjustable. Start around 0.1–0.2 mm and print a small test cut first, because the default depends on the slicer version.
Cutting in CAD
For anything that carries load, or anything you’ll print more than once, split the model in CAD. You can put the cut exactly where the design wants it, thicken the walls near the seam, and add a proper key. If the model is parametric, the split follows the design when dimensions change.
This is how Loftsmith handles big parts. Its engine has a split-with-pins operation that cuts a part along a plane and drills matching 1.9 mm dowel holes into both faces, and every piece is checked against your printer’s build volume. The generators use it: the flying wing is about 990 mm across, printed as 36 parts, with every panel sized to a 256 mm bed and joined over a carbon spar with filament pins.
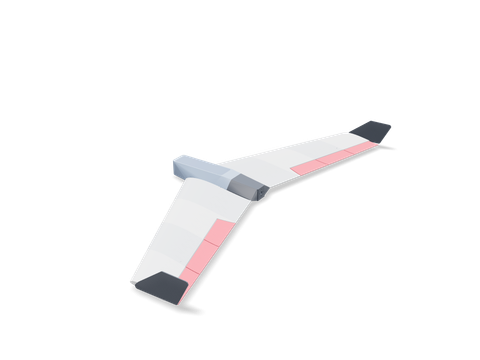 RC flying wingA 1 m flying wing split into bed-sized panels with filament-pin joints.436 × 994 × 86 mm · 427 g · 21 h 50 min
Gluing the pieces
| Glue | Works on | Good for | Watch out for |
|---|---|---|---|
| Cyanoacrylate (super glue) | PLA, ABS, ASA; weak on PETG | Small, tight joints and fast repairs | Brittle; no gap filling; fogs nearby surfaces white |
| Two-part epoxy | PLA, PETG, ABS, ASA | Large or loaded joints, filling small gaps | Slow to cure; mix accurately |
| Solvent welding (acetone) | ABS, ASA only | Seams that vanish after sanding | Does nothing to PLA or PETG |
Sand both faces flat, dry-fit with the pins in, and clamp while it sets. For a seam that must disappear under paint, fill it with a little glue or filler, sand, and prime. Most visible seams come from a joint that wasn’t flat, not from the glue.
If you want to keep the pieces together in one file, with their orientation and plates, save the project as 3MF. The STL vs 3MF guide explains why.
Questions people ask
How do I split an STL into parts for 3D printing?
Open it in Bambu Studio, OrcaSlicer or PrusaSlicer, select the model and use the Cut tool. Place the cut plane, add connectors (plugs or dowels) so the pieces align, and the slicer creates both halves on the plate. For a stronger joint, cut in CAD and add pins or a key there.
What can I use as alignment pins for 3D printed parts?
Plain 1.75 mm filament. Model 1.9 mm holes about 8 mm deep in both halves and push in a short piece of filament. It costs nothing and is always the right diameter.
What is the best glue for PLA?
Cyanoacrylate (super glue) for small, tight joints and quick repairs; two-part epoxy for large or load-bearing joints and for filling small gaps. For PETG, epoxy works better than super glue.
What is the build volume of the Bambu Lab A1 mini?
180 × 180 × 180 mm. The Bambu Lab A1, P1S and X1C print 256 × 256 × 256 mm.
Sources and method
The numbers come from Loftsmith’s CAD engine, which uses them to design and check every part it builds, and from the manufacturer and reference sources below. Every figure is checked against those sources and the engine’s own geometry. Found a mistake? Email [email protected] and we’ll fix it.