Print-in-place hinges: clearance, design and why they fuse
A hinge that comes off the bed already assembled feels like a magic trick the first time. The second time, it comes off as one solid lump. The difference is a few tenths of a millimetre, and a handful of design choices the slicer can’t make for you.
Short answer
With a 0.4 mm nozzle, leave 0.35–0.45 mm of gap around the pin and between the knuckles; well-tuned printers often manage 0.3 mm. Print the hinge with its pin parallel to the bed, shape the pin’s top so it never needs a bridge (a cone or a 45° roof), and keep the moving parts clear of the first layer, where elephant foot fuses them. Print a small hinge test before the real part.
A print-in-place hinge is two parts printed already assembled: a pin inside a ring, with a thin gap of air between them that the printer never fills. When it works, you snap the part off the bed, give it a firm twist, and it swings. When it doesn’t, you have a very precise lump.
The gap is the obvious variable, and it matters. But most fused hinges are caused by the three places where the printer misbehaves near that gap: the first layer, the roof over the pin, and the slicer’s idea of what needs support. This guide covers all four.
How much clearance
All the gaps below are per side: the air between the pin and the ring around it, and between one knuckle and the next along the axis.
| Printer and filament | Gap around the pin | Gap between knuckles |
|---|---|---|
| Well-tuned printer, PLA | 0.3–0.35 mm | 0.3 mm |
| Typical printer, PLA | 0.4 mm | 0.4 mm |
| PETG, or a printer that strings | 0.45–0.5 mm | 0.45 mm |
Why so much more than a normal sliding fit? Because both surfaces are printed at once, layer by layer, next to each other. Any ooze, stringing or bulge from one wall lands on the other, and there is no second chance to clean it off. A gap smaller than about one extrusion width is asking the printer to draw a line and not touch its neighbour, which is harder than it sounds.
Anatomy of a hinge that prints
The classic printable hinge has its pin running parallel to the bed, with alternating knuckles on each leaf, like a door hinge lying on its side.
- Knuckles: 3–4 mm radius is a good start (Loftsmith’s tester uses 4 mm). Much smaller and the pin becomes too thin to survive being freed.
- Pin: attached to one leaf’s knuckles and passing through the other’s. For a 4 mm knuckle, a pin of about 2.5–3 mm diameter leaves enough wall in the ring.
- Knuckle count: three is the simplest design that won’t wobble sideways; five spreads the load for a long lid.
- Stops: if the lid should only open to 90° or 180°, model the stop as part of the leaves. A hinge that swings all the way round will also fold back and crack.
The pin’s roof
With the pin lying sideways, the top of each ring is a small arch printed over the pin. A round arch starts flat, and flat means bridging over air, so it droops onto the pin below and welds to it.
The fix is to make every surface above a gap self-supporting. Shape the top of the hole as a 45° roof (a teardrop, point up), or cut the pin and its ring as cones instead of cylinders, so each knuckle nests on a sloped seat. Cone-shaped pins also locate the knuckles along the axis, which keeps the hinge from wobbling.
The first layer is the enemy
The first layer is pressed into the bed on purpose so the part sticks. That squish spreads the bottom of every wall outward, a flaw called elephant foot. It is harmless on a box and fatal on a hinge, because it closes the gap between the bottom of two knuckles.
- Lift the moving parts: leave the first 0.2–0.4 mm of the hinge area as a gap to the bed, or chamfer the bottom edges of every knuckle.
- Use your slicer’s elephant foot compensation.
- Slow the first layers down and keep the bed temperature no higher than it needs to be.
Freeing a stiff hinge
A new print-in-place hinge usually needs a firm first push to break the tiny bridges and hairs that span the gap. Bend it gently and evenly across its whole length. A few cycles later it should move freely.
If it takes real force, stop. A PLA hinge that is forced cracks at the pin. Warm it briefly with a hair dryer and try again, and if it still won’t move, the gap is too small for your printer: raise it by 0.05 mm and reprint. If the finished hinge is sloppy, go the other way.
When not to print it in place
Print-in-place is elegant, but it isn’t always the best hinge. If the lid carries weight, is opened hundreds of times a day, or must be tight with no play, print the two leaves separately and use a metal pin: a nail, a piece of steel rod, or 1.75 mm filament for a light-duty hinge. A living hinge (a thin flexible web) works in PETG or TPU for small boxes, but PLA fatigues and cracks within a few dozen bends.
One practical note if you design in Loftsmith: a hinge whose parts must stay assembled on the bed is exported as a single compound part, so the gaps survive into the 3MF. The viewer can’t animate its moving bodies separately yet, which is why the captive fidget moves as one piece in the preview.
Test before the lid
A hinge is the easiest thing in the world to test, because a test hinge is small. Print one at 0.4 mm, free it, and adjust. It costs about 5 g and 11 minutes on an A1, which beats reprinting a two-hour box.
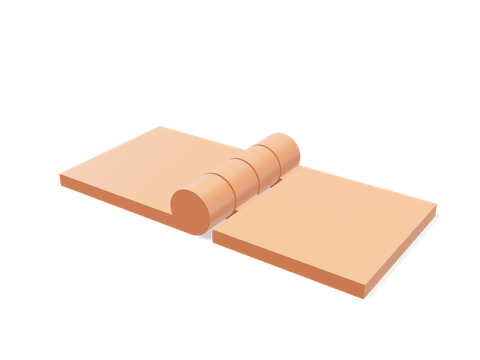 Print-in-place hinge testerA small hinge with adjustable pin clearance, knuckle radius and knuckle length.61 × 28 × 8 mm · 5 g · 11 min
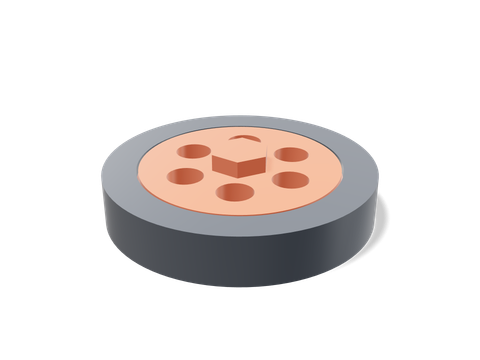 Captive rotary fidgetA captive rotating wheel that uses the same clearance ideas on a ring instead of a pin.32 × 32 × 8 mm · 4 g · 15 min
Once you know your number, write it down next to your fit clearances. The two together cover nearly every moving part you’ll ever print.
Questions people ask
What clearance does a print-in-place hinge need?
Start at 0.4 mm around the pin with a 0.4 mm nozzle. The usual working range is 0.35–0.45 mm; well-tuned Bambu Lab and Prusa printers often go down to 0.3 mm. Change it in 0.05 mm steps.
Why did my print-in-place hinge fuse?
Usually one of three things: the gap is too small for your printer, the first layer squashed the knuckles together (elephant foot), or the top of the pin bridged and drooped onto the knuckle below. Raise the moving parts off the first layer and give the pin a self-supporting roof.
Do print-in-place hinges need supports?
No, and they shouldn’t have any. Support material trapped between moving surfaces is almost impossible to remove. Design the pin and knuckles so every overhang is 45° or steeper.
Should I print hinges in PLA or PETG?
PLA gives crisper small gaps and is the easier start. PETG makes a tougher hinge but tends to string across gaps, so it usually needs about 0.05 mm more clearance.
Sources and method
The numbers come from Loftsmith’s CAD engine, which uses them to design and check every part it builds, and from the manufacturer and reference sources below. Every figure is checked against those sources and the engine’s own geometry. Found a mistake? Email [email protected] and we’ll fix it.