프린트 인 플레이스 케이블 드래그 체인
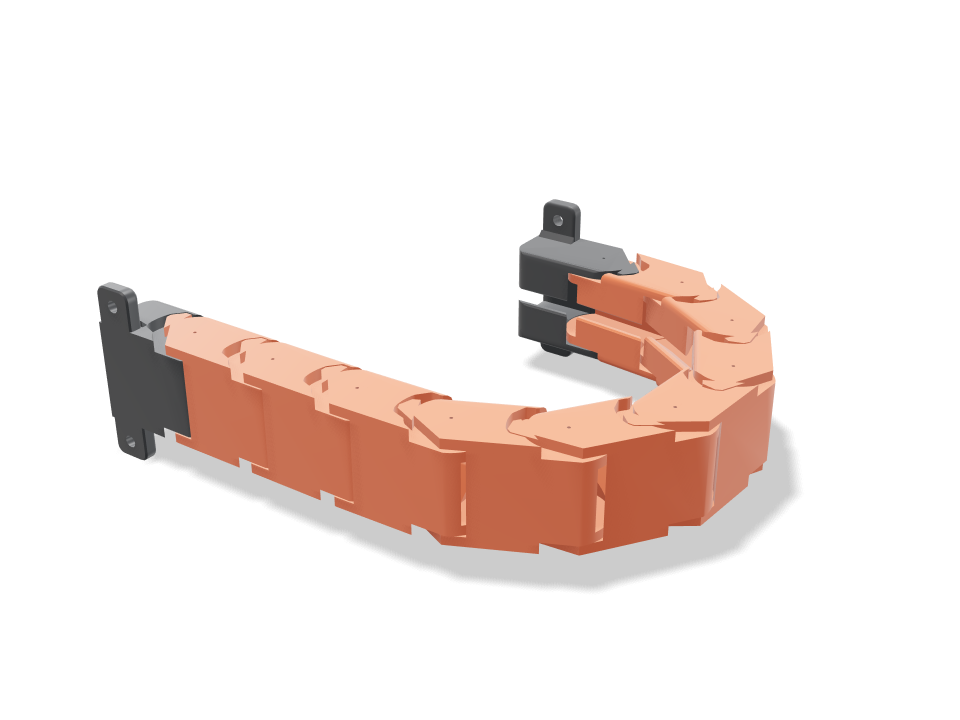
3D 프린터나 CNC 축용 케이블 드래그 체인(에너지 체인)이 연결된 채로 베드에서 떨어져요. 원뿔 핀으로 이어진 똑같은 주황색 링크 아홉 개와, 각각 M3 나사 두 개로 고정하는 차콜색 고정 브래킷과 이동 브래킷으로 이뤄져요. Travel을 누르면 이동 끝이 150mm 들어갔다 나왔다 하고, 실제 축에서처럼 체인이 U자로 굽으며 굴러가요. 모든 조인트의 스토퍼 이가 각 링크를 설정한 반경까지만, 그것도 한 방향으로만 굽게 해서 위쪽 구간이 처지지 않고 거의 곧게 유지돼요. 검사에서는 정지 상태에서 링크가 닿지 않는지, 핀이 빠지지 않는지, 스토퍼가 양방향으로 걸리는지, 완만한 굽힘에서 곧은 상태와 U자 상태 모두 선이 체인 안에 자유롭게 놓이는지, 457개 동작 자세가 전부 걸리지 않는지 확인해요.
Ask for the sizes you want to tweak, e.g. “make the width adjustable”.
기본 크기 사양
Bambu Lab A1에서 pla로 실제 빌드해 측정했어요. 위 슬라이더를 움직이면 모든 숫자가 실시간으로 바뀌어요.
- 전체 크기
- 284 × 19 × 48 mm
- 부품 수
- 11
- 필라멘트
- 65 g
- 출력 시간
- 2 h 29 min
- 빌드 플레이트
- 1
- 서포트
- 필요 없음
공학 검사
검사 이름과 파라미터 이름은 CAD 엔진에서 그대로 나오기 때문에 영어로 표시돼요.
- Links never touch at rest0.4 mm joint gap at every pin, plate and stop face
- Pins are captureda link shifted 0.92 mm sideways or 0.70 mm along the pin hits its neighbour (2.65 / 83.20 mm³): the cone pins sit in the sockets between the cheeks and cannot pull out
- Bends freely to the bend angle30.2 degrees per joint gives a 50 mm bend radius at a 26.0 mm pitch (6.0 links per half turn)
- Stop at the bend angle4 degrees past the bend the tooth is into its pocket wall (3.22 mm³)
- Stays straight the other wayreverse bend stops within 2.25 degrees per joint (tooth on the straight stop)
- Upper run is self-supportinga 100 mm stick-out puts 0.98 N on each stop tooth (0.06 MPa shear; PLA allows 5.0); stop play lets the longest upper run (6 links) sag about 4.6 mm
- Pins take a hard tug30 N pull on the chain: 0.48 MPa shear in the two 6.3 mm cone pins (5.0 allowed across layers)
- Cables lie free in the chainoverlap 0.00 mm³ straight and 0.00 mm³ in the U at mid travel
- Cables bend gentlythe bundle bends at 52.6 mm in the U, at least 7.5 x the 5 mm lead (37.5 mm, chain-rated cable)
- Cables stay inroof slot 4.25 mm vs 5 mm leads: each lead presses in past the 50-degree lips and cannot fall out
- Travelmoving end runs 150 mm (of 150 wanted, 158 mm possible) with the U 119 mm tall
- Every body starts on the bedprinted standing up: every link and bracket rests on its -Y edge
- Bracket ears hold the chaina 30 N tug puts 7.4 N on the far M3 screws; 1.32 MPa in a 4 mm ear (16.7 allowed)
- Screws seat on the earsM3 heads (5.7 mm) land flat on 4 mm ears, clear of the gussets; 3.1 mm of ear outside each hole
- drag chain stays together after printingall 11 bodies are captive: none can be pulled out along any axis
- drag chain is held firmlyevery captive body is held by at least 0.8 mm (two perimeters)
- lead 1 (5 mm) goes in166 poses along its path clear of every part.
- lead 2 (5 mm) goes in166 poses along its path clear of every part.
- lead 3 (5 mm) goes in166 poses along its path clear of every part.
- M3 screws: fixed bracket goes in15 poses along its path clear of every part.
- M3 screws: moving bracket goes in15 poses along its path clear of every part.
- driver: fixed bracket screw goes in15 poses along its path clear of every part.
- driver: moving bracket screw goes in15 poses along its path clear of every part.
조절 가능한 치수
| 설정 | 기본값 | 범위 |
|---|---|---|
| Cable bundle width | 15 mm | 10–18 mm |
| Cable bundle height (cable diameter) | 5 mm | 3.5–6.5 mm |
| Bend radius (pin line) | 50 mm | 42–60 mm |
| Link count | 9 | 7–9 |
| Joint gap | 0.4 mm | 0.3–0.6 mm |
부품 목록
| 부품 | 수량 | 크기(mm) | 필라멘트 | 시간 |
|---|---|---|---|---|
| fixed bracket | 1 | 48 × 48 × 19 | 6 g | 14 min |
| link 1 | 1 | 52 × 52 × 19 | 6 g | 14 min |
| link 2 | 1 | 52 × 52 × 19 | 6 g | 14 min |
| link 3 | 1 | 52 × 52 × 19 | 6 g | 14 min |
| link 4 | 1 | 52 × 52 × 19 | 6 g | 14 min |
| link 5 | 1 | 52 × 52 × 19 | 6 g | 14 min |
| link 6 | 1 | 52 × 52 × 19 | 6 g | 14 min |
| link 7 | 1 | 52 × 52 × 19 | 6 g | 14 min |
| link 8 | 1 | 52 × 52 × 19 | 6 g | 14 min |
| link 9 | 1 | 52 × 52 × 19 | 6 g | 14 min |
| moving bracket | 1 | 52 × 52 × 19 | 6 g | 13 min |
만드는 법
- 케이블 묶음 너비와 높이를 지나갈 선에 맞추고(높이는 선 지름), 축에 공간이 되는 굽힘 반경을 정하세요.
- 링크 수를 고르세요. Travel 검사가 그 링크 수로 이동 끝이 얼마나 갈 수 있는지 알려 줘요.
- 체인 전체를 베드 대각선 방향으로 세워 한 번에 출력한 다음, 모든 조인트를 전체 굽힘으로 몇 번 꺾어 풀어 주세요.
- 선을 통과시키고, 고정 브래킷을 프레임에, 이동 브래킷을 캐리지에 M3 나사로 고정한 뒤, 체인을 U자로 굴려 넘기세요.
출력 팁
- PLA나 PETG에 벽 3개, 서포트 없이 출력하세요. 체인이 모서리로 서 있어서, 높고 좁은 링크가 버티도록 브림을 쓰면 좋아요.
- 첫 출력이 뻑뻑하면 조인트 유격을 0.05mm 올리고, 덜컹거리면 낮추세요. 링크 한두 개를 먼저 출력해 프린터를 시험해 보세요.
자주 묻는 질문
튀어나온 부분이 처지지 않나요?
조금만요. 각 조인트는 스토퍼 이가 막기 전까지 뒤로 약 2도 굽을 수 있어서, 양 끝을 잡은 150mm 위쪽 구간은 대략 5mm 내려가요. 지지 없는 더 긴 구간은 받침 트레이가 필요해요.
케이블은 어떻게 넣나요?
플러그를 달기 전에 한쪽 끝부터 통과시키거나, 선을 하나씩 지붕의 슬롯으로 밀어 넣으세요. 슬롯이 선보다 좁아서 한 번 들어가면 빠지지 않아요.
굽힘 반경은 어떻게 정하나요?
케이블의 정격 굽힘 반경을 쓰세요. 체인용 케이블은 보통 지름의 7.5배 이상이 필요하고, 그보다 작으면 케이블 굽힘 검사가 알려 줘요.
카탈로그에 없는 모양이 필요하세요? 텍스트 CAD 변환으로 직접 말로 설명해 보세요
Comments