볼 조인트 GoPro 책상 암
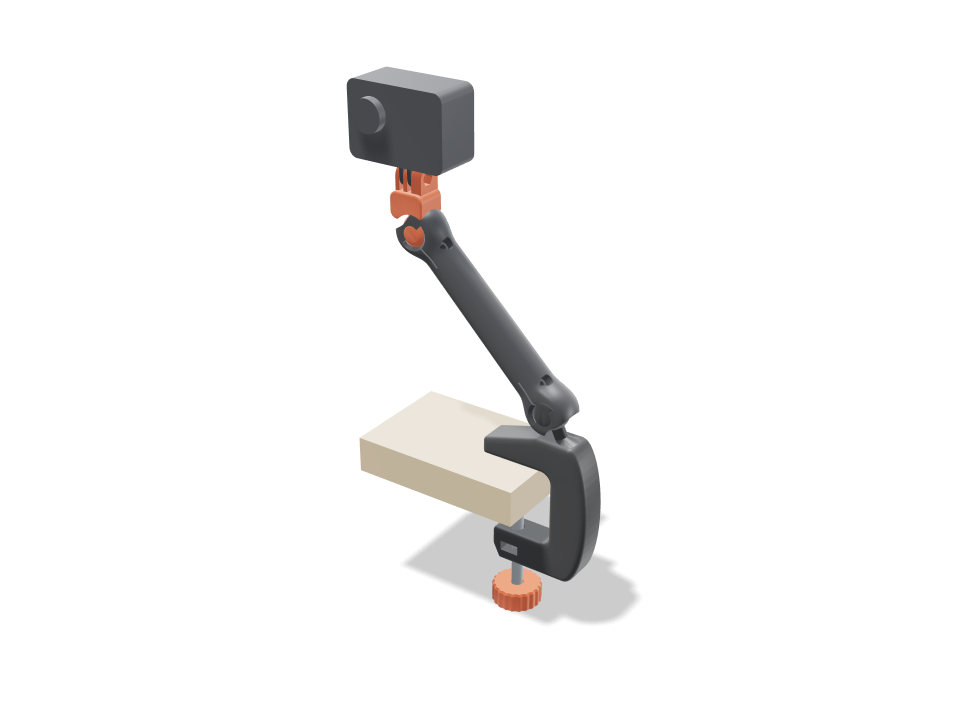
책상 모서리에 클램프로 고정하고 표준 3갈래 마운트로 GoPro를 잡아 주는 카메라 암이에요. 휘어진 C 클램프, 끝이 가늘어지는 암, 카메라 헤드가 볼 조인트 두 개가 소켓 안에 들어간 채로 하나의 납작한 부품으로 함께 출력돼요. 각 볼은 작고 고른 유격으로 소켓에 들어가 있고, 가장 넓은 부분을 넘어 감싸는 립이 있어서 돌고 기울어지지만 빠지지는 않아요. 클램프 쪽 볼은 책상 바깥으로 기울어 있고, 각 조인트는 어느 방향으로든 약 29도 기울고 한 바퀴 다 돌기 때문에 암이 약 45도 바깥으로 뻗어도 헤드가 카메라를 수평으로 유지해요. 조인트마다 M4 나사 하나가 분할 소켓을 조여 자세를 고정해요. 검사에서는 볼이 떨어진 채 출력되고 빠지지 않는지, 넥이 립에 닿기 전까지 각 조인트가 얼마나 기우는지, 클램프 모서리와 볼 넥이 여유 있게 하중을 버티는지, 나사가 카메라에 필요한 마찰력의 약 4배를 내는지, 클램프가 15~45mm 책상에 맞는지 확인해요.
Ask for the sizes you want to tweak, e.g. “make the width adjustable”.
기본 크기 사양
Bambu Lab A1에서 pla로 실제 빌드해 측정했어요. 위 슬라이더를 움직이면 모든 숫자가 실시간으로 바뀌어요.
- 전체 크기
- 148 × 34 × 294 mm
- 부품 수
- 5
- 필라멘트
- 73 g
- 출력 시간
- 2 h 3 min
- 빌드 플레이트
- 2
- 서포트
- 필요 없음
공학 검사
검사 이름과 파라미터 이름은 CAD 엔진에서 그대로 나오기 때문에 영어로 표시돼요.
- Flare runs into the head blockthe flare grows to 15.6 mm across, 1.5 mm inside the block's rounded edge, and enters the cup with 0.0 mm of straight neck showing
- Ball captured past the equatorsocket wraps 37 deg past the equator; opening 19.6 mm vs ball 24 mm (21.6 mm across the flats, so even panned 90 deg there is 1.0 mm of lip); pulling either joint 1.15 mm out hits the lip
- Joints print free0.35 mm surface gap all round each ball; 1.01 mm between ball and socket at the bed
- Tilt cone at the clamp jointfree to 29 deg in all four directions (0.00/0.00/0.00/0.00 mm3); the neck meets the lip by 33/33/33/33 deg; pan unlimited
- Tilt cone at the camera jointhead swings 29 deg each way on the arm (0.00/0.00/0.00/0.00 mm3)
- Aiming pose cleararm leans 45 deg out over the desk (stud 25 + joint 20), camera level and facing forward; each joint at 20 of 30 deg
- Ball neck takes a bump14.9 MPa in the 8.6 mm neck with the arm at its widest reach (55 deg from vertical), camera bumped (x2, root Kt 1.67); PLA allows 16.7 along the layers
- Pinch screw holds the pose1.23 N m of friction from an M4 snugged to 0.4 N m vs 0.28 N m from the camera and arm at widest reach (x4.4); slit 1.2 mm closes 0.70 mm to grip
- Clamp corners carry the bolt13.2 MPa inside the 7 mm corner bends (curved beam x1.70, measured sections 22 / 22 mm) at 313 N from a 0.5 N m knob twist; PLA allows 16.7 along the layers
- Clamp will not rock on the desk5.3 N m of jaw grip vs 0.95 N m from the arm sticking straight out, bumped
- Fits desks 15-45 mmM8 x 80: at 15 mm the knob sits 12 mm under the jaw, at 45 mm the pad clears the jaw by 3 mm; throat 54 mm
- GoPro fingers fit the prongs3 prongs 3 mm thick with 3.1 mm gaps (15.2 mm stack), M5 bore, nut pocket in the outer prong
- Thumb screw goes throughM5 thumb screw from the left into the captured nut
- Prints in one goclamp, arm and head lie flat in a 219 mm square turned 21 deg on the 256 mm bed, 21.6 mm tall
- Pad and knob sit on the boltpad pressed on the bolt tip against the desk underside, knob on the bolt head 22 mm under the jaw
- camera arm stays together after printingall 3 bodies are captive: none can be pulled out along any axis
- camera arm is held firmlyevery captive body is held by at least 0.8 mm (two perimeters)
- GoPro goes in35 poses along its path clear of every part.
- thumb screw goes in20 poses along its path clear of every part.
- M8 nut goes in20 poses along its path clear of every part.
- M4 x 16 pinch screw 1 goes in15 poses along its path clear of every part.
- M4 x 16 pinch screw 2 goes in15 poses along its path clear of every part.
조절 가능한 치수
| 설정 | 기본값 | 범위 |
|---|---|---|
| Arm length (ball to ball) | 140 mm | 100–150 mm |
| Desk thickness | 25 mm | 15–45 mm |
| Ball diameter | 24 mm | 20–28 mm |
| Joint gap (each side) | 0.35 mm | 0.3–0.45 mm |
부품 목록
| 부품 | 수량 | 크기(mm) | 필라멘트 | 시간 |
|---|---|---|---|---|
| clamp | 1 | 95 × 133 × 22 | 34 g | 50 min |
| arm | 1 | 156 × 89 × 22 | 24 g | 38 min |
| camera head | 1 | 40 × 53 × 22 | 8 g | 17 min |
| clamp pad | 1 | 26 × 26 × 6 | 2 g | 7 min |
| clamp knob | 1 | 34 × 34 × 14 | 5 g | 12 min |
만드는 법
- 책상 두께와 원하는 암 길이를 설정한 뒤 볼 크기를 고르세요. 볼이 클수록 조금 더 기울고 더 단단히 잡아요.
- 암은 뒷면을 아래로 서포트 없이 한 번에 출력하고, 노브와 패드도 출력하세요. 테스트 출력이 너무 빡빡하거나 헐겁지 않다면 조인트 유격은 0.35mm 그대로 두세요.
- 각 볼을 힘 있게 비틀어 풀고, M4 나사와 너트 두 세트를 끼운 뒤, M8 볼트 머리를 노브에, M8 너트를 클램프 슬롯에 눌러 넣으세요(볼트 길이는 빌드가 알려 줘요. 기본 크기에서는 M8 x 80).
- 책상에 클램프로 고정하고, GoPro 핑거를 손나사로 마운트에 끼워 방향을 잡은 다음, M4 나사를 조여 자세를 고정하세요.
출력 팁
- 서포트는 꺼 두세요. 서포트 재료가 조인트 유격에 출력되면 볼이 붙어 버려요.
- PLA나 PETG에 벽 3개면 잘 돼요. 매끈한 PEI 플레이트를 쓰고 첫 레이어를 확인하세요. 첫 레이어가 눌리는 게 볼이 소켓에 붙는 가장 흔한 원인이에요.
- 풀고 나서 조인트가 뻑뻑하면, 카메라를 달기 전에 각각 전체 범위로 몇 번 움직여 주세요.
자주 묻는 질문
GoPro를 달아도 처지지 않나요?
M4 조임 나사를 조이면 괜찮아요. 검사에서는 암을 가장 멀리 뻗은 상태에서 GoPro를 잡는 데 필요한 마찰력의 약 4배가 나와요. 나사를 풀면 조인트가 자유롭게 움직이니, 그렇게 방향을 맞추면 돼요.
스마트폰에도 쓸 수 있나요?
끝부분이 표준 GoPro 3갈래 마운트라서 GoPro 핑거가 있는 폰 클립이면 다 맞아요. 폰 클립 자체는 이 디자인에 포함되어 있지 않아요.
어떤 하드웨어가 필요한가요?
클램프용 M8 볼트와 너트 한 세트(기본 크기에서 M8 x 80), 조인트용 M4 나사와 너트 두 세트(기본 크기에서 M4 x 16), 카메라용 GoPro 손나사와 M5 너트예요. 슬라이더에 맞는 정확한 길이는 빌드가 알려 줘요.
카탈로그에 없는 모양이 필요하세요? 텍스트 CAD 변환으로 직접 말로 설명해 보세요
Comments