3D 프린팅 공구를 위한 프린트 인 플레이스 공구함
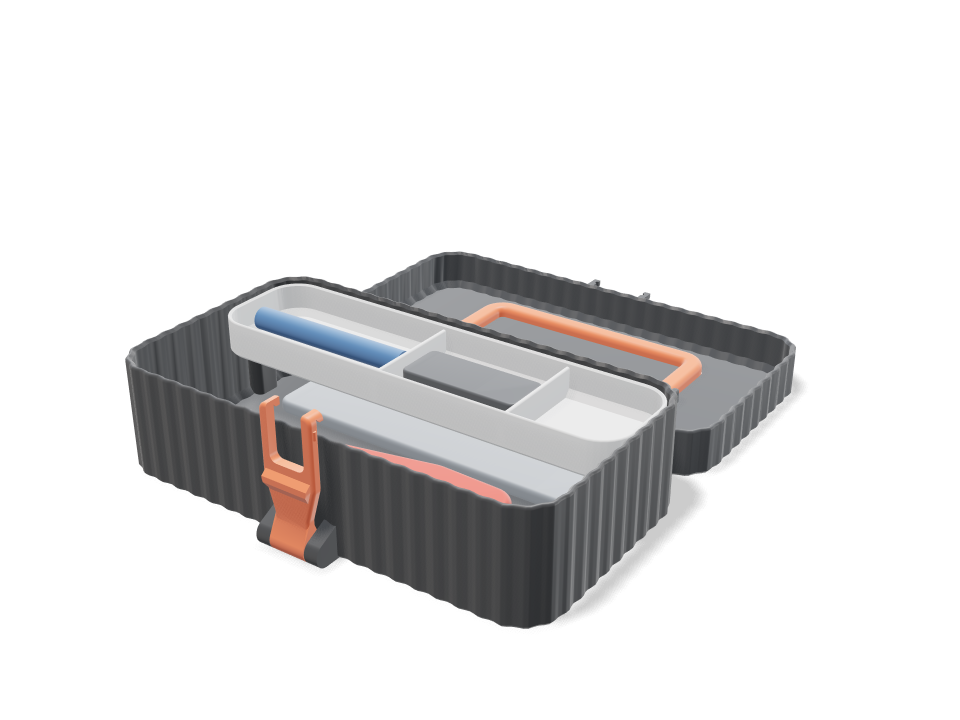
홈이 파인 공구함이 이미 조립된 채로 베드에서 떨어져요. 본체는 세워서, 뚜껑은 그 뒤에 뒤집어서 출력되고 핀이 들어간 너클 힌지로 연결되니 붙이거나 나사를 박을 게 없어요. 주황색 래치는 상자 아래쪽에서 자기 핀을 축으로 젖혀 올라가 뚜껑의 돌기에 걸리고, 탄력 있는 두 갈래 갈고리가 뚜껑 옆면에 딸깍 끼워져요. 손잡이는 뚜껑 윗면에 자기 핀으로 납작하게 들어가 있다가 들고 다닐 때 세워요. 따로 출력하는 꺼낼 수 있는 트레이에는 노즐 바늘과 육각 렌치를 니퍼와 스크레이퍼 위에 보관해요. 검사에서는 출력되는 모든 바디가 동작 유격을 두고 떨어져 있는지, 두 가지 동작(닫고 래치 걸기, 손잡이 세우기)이 모든 샘플 자세에서 걸리지 않는지, 뚜껑을 닫은 상태로 공구가 들어가는지, 갈고리 스냅이 PLA 파단 변형률의 4분의 1 미만인지, 래치·힌지·손잡이가 충격을 포함해 꽉 찬 상자를 버티는지 확인해요.
Ask for the sizes you want to tweak, e.g. “make the width adjustable”.
기본 크기 사양
Bambu Lab A1에서 pla로 실제 빌드해 측정했어요. 위 슬라이더를 움직이면 모든 숫자가 실시간으로 바뀌어요.
- 전체 크기
- 200 × 246 × 60 mm
- 부품 수
- 5
- 필라멘트
- 225 g
- 출력 시간
- 5 h 28 min
- 빌드 플레이트
- 2
- 서포트
- 필요 없음
공학 검사
검사 이름과 파라미터 이름은 CAD 엔진에서 그대로 나오기 때문에 영어로 표시돼요.
- Printed-in-place bodies stand freetotal overlap 0.000 mm³ between base, open lid, latch and handle as printed
- Open lid lands on the bedlid outer face at z = 0.00 mm, handle flush in its slot
- Closed lid seats on the rim0.3 mm above the rim when shut; hinge and latch cheeks locate it; overlap 0.000 mm³
- Hinge knuckle wall1.90 mm around a 4.4 mm pin, 0.4 mm radial gap, 0.4 mm axial gaps
- Latch sits clear when shutoverlap 0.000 mm³ with the closed lid
- Hook holds the lid downlip land bears on the lug over 2.0 mm; lifting the lid 1 mm runs the lug into the lip (11 mm³)
- Snap tines flex safely0.75 % peak strain at 0.5 mm flex (20 mm tine, 4.0 mm wide); PLA breaks at 4 %, kept under a quarter for repeated snaps
- Snap feel24 N squeeze to pass the cheeks (both tines): a deliberate thumb push
- Latch lip carries the base0.7 MPa bending at the lip root, 7 N (half of 0.67 kg, x2 for a bump); PLA allows 16.7
- Latch pivot pin0.2 MPa shear, 0.1 MPa bearing on the 4.4 mm pin
- Hinge pin0.1 MPa shear, 0.0 MPa bearing per lid knuckle
- Handle grip carries the box5.5 MPa at mid-grip for 0.75 kg x2; printed flat so it bends along the layers; allows 16.7
- Handle pivots0.8 MPa shear, 0.5 MPa bearing on each 3.5 mm pin
- Fits: flush cuttersoverlap 0.00 mm³ with base, tray and the closed lid
- Fits: scraperoverlap 0.00 mm³ with base, tray and the closed lid
- Fits: nozzle needle caseoverlap 0.00 mm³ with base, tray and the closed lid
- Fits: hex keysoverlap 0.00 mm³ with base, tray and the closed lid
- A hand fits under the raised handle85 x 30 mm grip envelope between the arms, 31.5 mm clear under the grip, 101 mm between the arms
- Handle swings clear of the lidworst overlap 0.000 mm³ over 0-90 degrees about its pins (0.5 mm slot gap, 0.4 mm pin gap)
- Fits the A1 bed in one print200 x 246 mm printed open (256 mm bed)
- Latch detent is real and clearsswung out 30 deg it clears the closing lid; back at 6 deg the bumps just meet the cheeks (0.00 mm³); at 2.5 deg the rigid bumps overlap the cheeks by 1.6 mm³, the 0.5 mm the tines must flex to snap home
- toolbox stays together after printingall 4 bodies are captive: none can be pulled out along any axis
- toolbox is held firmlyevery captive body is held by at least 0.8 mm (two perimeters)
- flush cutters goes in40 poses along its path clear of every part.
- scraper goes in63 poses along its path clear of every part.
- nozzle needle case goes in30 poses along its path clear of every part.
- hex keys goes in30 poses along its path clear of every part.
조절 가능한 치수
| 설정 | 기본값 | 범위 |
|---|---|---|
| Length | 200 mm | 170–240 mm |
| Depth (front to back) | 108 mm | 90–110 mm |
| Closed height | 70 mm | 56–85 mm |
| Hinge radial gap | 0.4 mm | 0.3–0.6 mm |
| Wall | 2.4 mm | 1.8–3.2 mm |
| Lift-out tray | 켜짐 | 켜짐 / 꺼짐 |
부품 목록
| 부품 | 수량 | 크기(mm) | 필라멘트 | 시간 |
|---|---|---|---|---|
| base | 1 | 200 × 129 × 49 | 109 g | 2 h 30 min |
| lid | 1 | 200 × 126 × 40 | 72 g | 1 h 41 min |
| latch | 1 | 26 × 11 × 60 | 3 g | 14 min |
| handle | 1 | 119 × 49 × 8 | 7 g | 14 min |
| tray | 1 | 192 × 49 × 16 | 33 g | 49 min |
만드는 법
- 길이, 깊이, 높이를 내 공구에 맞춰 설정하세요. 기본값은 125mm 니퍼, 150mm 스크레이퍼, 바늘 케이스, 육각 렌치 세트가 들어가요.
- 상자는 배치된 그대로(본체는 세우고 뚜껑은 뒤에 엎어서) 하나의 오브젝트로, PLA 또는 PETG로 서포트 없이 출력하세요. 트레이는 따로 출력해요.
- 풀어 주기: 뚜껑과 래치를 손으로 살살 움직여 부드럽게 움직이게 한 다음, 손잡이를 홈에서 들어 올리세요.
- 뚜껑을 닫고 래치를 젖혀 올린 뒤 윗부분을 눌러 갈고리가 옆면에 딸깍 끼워지게 하세요. 들고 다닐 땐 손잡이를 세우면 돼요.
출력 팁
- 프린터가 뜨겁게 출력되거나 첫 레이어가 눌리는 편이라면 힌지 유격 테스트를 먼저 출력하세요. 부품이 붙으면 힌지 반경 유격을 0.5mm로 올리세요.
- 베드 근처 레이어를 합쳐 버리는 코끼리발 보정 꼼수는 꺼 두세요. 래치 너클과 손잡이는 첫 레이어부터 시작해요.
- PETG가 PLA보다 래치 갈고리의 스냅 수명이 길어요. 가끔 쓰는 용도라면 PLA도 괜찮아요.
자주 묻는 질문
나사나 접착제가 필요한가요?
아니요. 힌지, 래치, 손잡이 모두 자기 핀으로 조립된 채 출력돼요. 따로 된 부품은 트레이뿐이고, 그냥 넣으면 돼요.
손잡이로 들고 다녀도 래치가 버티나요?
들고 다닐 때 본체는 힌지와 래치 립에 매달려요. 검사에서는 약 0.7kg에 충격을 더해도 여유가 크게 남아요. 갈고리의 딸깍 소리는 래치를 닫아 두는 손맛이니, 공구를 넣은 채로 한 번 시험해 보세요.
출력 후 뚜껑이나 래치가 안 움직이면요?
천천히 앞뒤로 움직여 보세요. 계속 붙어 있으면 힌지 유격을 조금 키워 다시 출력하세요. 모든 유격이 이 슬라이더에 맞춰 바뀌어요.
카탈로그에 없는 모양이 필요하세요? 텍스트 CAD 변환으로 직접 말로 설명해 보세요
Comments