一体打印拖链
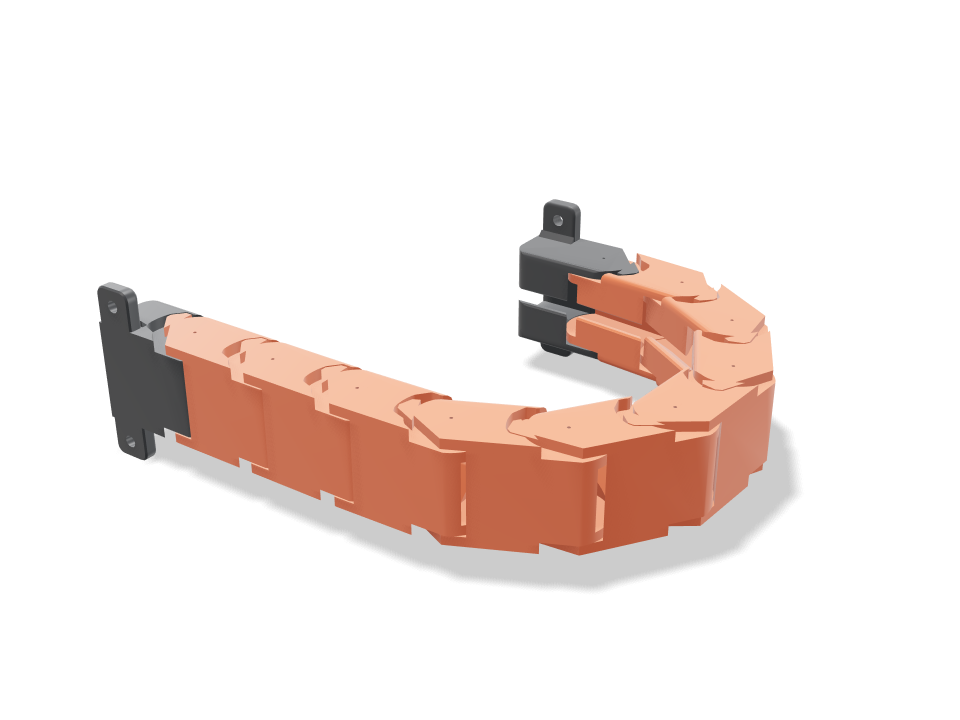
一条用于 3D 打印机或 CNC 轴的拖链(坦克链),从打印板上取下就已经连好:九个相同的橙色链节由锥形销连接,加上炭灰色的固定端支架和移动端支架,各用两颗 M3 螺丝安装。按下 Travel,移动端往返运行 150 mm,链条像在真实的轴上一样滚过 U 形弯。每个关节上的限位齿让链节只能弯到你设定的半径,而且只能朝一个方向弯,所以上段几乎保持笔直,不会下垂。校验证明静止时链节互不接触,销不会拔出,限位在两个方向都能挡住,在平缓弯曲下,无论伸直还是在 U 形弯里,线缆都能在链内自由放置,而且全部 457 个运动姿态都不干涉。
Building the model
Loading the 3D view
No adjustable sizes
Ask for the sizes you want to tweak, e.g. “make the width adjustable”.
默认尺寸下的规格
在 Bambu Lab A1 上用 pla 实际构建测得。拖动上方滑块时,每个数字都会实时更新。
- 整体尺寸
- 284 × 19 × 48 mm
- 零件数
- 11
- 耗材
- 65 g
- 打印时间
- 2 h 29 min
- 打印盘
- 1
- 支撑
- 不需要
工程校验
校验和参数名称直接来自 CAD 引擎,以英文显示。
- Links never touch at rest0.4 mm joint gap at every pin, plate and stop face
- Pins are captureda link shifted 0.92 mm sideways or 0.70 mm along the pin hits its neighbour (2.65 / 83.20 mm³): the cone pins sit in the sockets between the cheeks and cannot pull out
- Bends freely to the bend angle30.2 degrees per joint gives a 50 mm bend radius at a 26.0 mm pitch (6.0 links per half turn)
- Stop at the bend angle4 degrees past the bend the tooth is into its pocket wall (3.22 mm³)
- Stays straight the other wayreverse bend stops within 2.25 degrees per joint (tooth on the straight stop)
- Upper run is self-supportinga 100 mm stick-out puts 0.98 N on each stop tooth (0.06 MPa shear; PLA allows 5.0); stop play lets the longest upper run (6 links) sag about 4.6 mm
- Pins take a hard tug30 N pull on the chain: 0.48 MPa shear in the two 6.3 mm cone pins (5.0 allowed across layers)
- Cables lie free in the chainoverlap 0.00 mm³ straight and 0.00 mm³ in the U at mid travel
- Cables bend gentlythe bundle bends at 52.6 mm in the U, at least 7.5 x the 5 mm lead (37.5 mm, chain-rated cable)
- Cables stay inroof slot 4.25 mm vs 5 mm leads: each lead presses in past the 50-degree lips and cannot fall out
- Travelmoving end runs 150 mm (of 150 wanted, 158 mm possible) with the U 119 mm tall
- Every body starts on the bedprinted standing up: every link and bracket rests on its -Y edge
- Bracket ears hold the chaina 30 N tug puts 7.4 N on the far M3 screws; 1.32 MPa in a 4 mm ear (16.7 allowed)
- Screws seat on the earsM3 heads (5.7 mm) land flat on 4 mm ears, clear of the gussets; 3.1 mm of ear outside each hole
- drag chain stays together after printingall 11 bodies are captive: none can be pulled out along any axis
- drag chain is held firmlyevery captive body is held by at least 0.8 mm (two perimeters)
- lead 1 (5 mm) goes in166 poses along its path clear of every part.
- lead 2 (5 mm) goes in166 poses along its path clear of every part.
- lead 3 (5 mm) goes in166 poses along its path clear of every part.
- M3 screws: fixed bracket goes in15 poses along its path clear of every part.
- M3 screws: moving bracket goes in15 poses along its path clear of every part.
- driver: fixed bracket screw goes in15 poses along its path clear of every part.
- driver: moving bracket screw goes in15 poses along its path clear of every part.
可调尺寸
| 设置 | 默认 | 范围 |
|---|---|---|
| Cable bundle width | 15 mm | 10–18 mm |
| Cable bundle height (cable diameter) | 5 mm | 3.5–6.5 mm |
| Bend radius (pin line) | 50 mm | 42–60 mm |
| Link count | 9 | 7–9 |
| Joint gap | 0.4 mm | 0.3–0.6 mm |
零件清单
| 零件 | 数量 | 尺寸(mm) | 耗材 | 时间 |
|---|---|---|---|---|
| fixed bracket | 1 | 48 × 48 × 19 | 6 g | 14 min |
| link 1 | 1 | 52 × 52 × 19 | 6 g | 14 min |
| link 2 | 1 | 52 × 52 × 19 | 6 g | 14 min |
| link 3 | 1 | 52 × 52 × 19 | 6 g | 14 min |
| link 4 | 1 | 52 × 52 × 19 | 6 g | 14 min |
| link 5 | 1 | 52 × 52 × 19 | 6 g | 14 min |
| link 6 | 1 | 52 × 52 × 19 | 6 g | 14 min |
| link 7 | 1 | 52 × 52 × 19 | 6 g | 14 min |
| link 8 | 1 | 52 × 52 × 19 | 6 g | 14 min |
| link 9 | 1 | 52 × 52 × 19 | 6 g | 14 min |
| moving bracket | 1 | 52 × 52 × 19 | 6 g | 13 min |
制作方法
- 按要走的线设置线束宽度和高度(高度就是线径),再设置你的轴有空间容纳的弯曲半径。
- 选链节数:Travel 校验会告诉你这么多链节时移动端能走多远。
- 整条链沿打印板对角线立着一次打印,然后把每个关节在全弯曲范围内弯几次让它活动开。
- 把线穿进去,用 M3 螺丝把固定端支架装到机架上、移动端支架装到滑车上,再让链条翻转成 U 形。
打印建议
- 用 PLA 或 PETG、3 层壁、无支撑打印;链条是侧立的,加个 brim 能让又高又窄的链节站稳。
- 如果第一次打印发紧,把关节间隙加大 0.05 mm;有松旷声就减小。先打一两个链节测试你的打印机。
常见问题
悬伸出去时会下垂吗?
只会一点:每个关节在限位齿挡住之前能反向弯约 2 度,所以两端固定的 150 mm 上段大约下沉 5 mm。更长的无支撑段需要加托槽。
线怎么放进去?
装插头之前从一端穿进去,或者把每根线从顶部的开口槽挤进去。开槽比线窄,放进去就不会掉出来。
弯曲半径该怎么选?
按线缆的额定弯曲半径来;拖链专用线通常要求线径的 7.5 倍或以上,低于这个值时线缆弯曲校验会提示你。
需要目录里没有的形状? 用文字生成 CAD,用你自己的话描述它
Comments