3Dプリント用工具のための一体造形ツールボックス
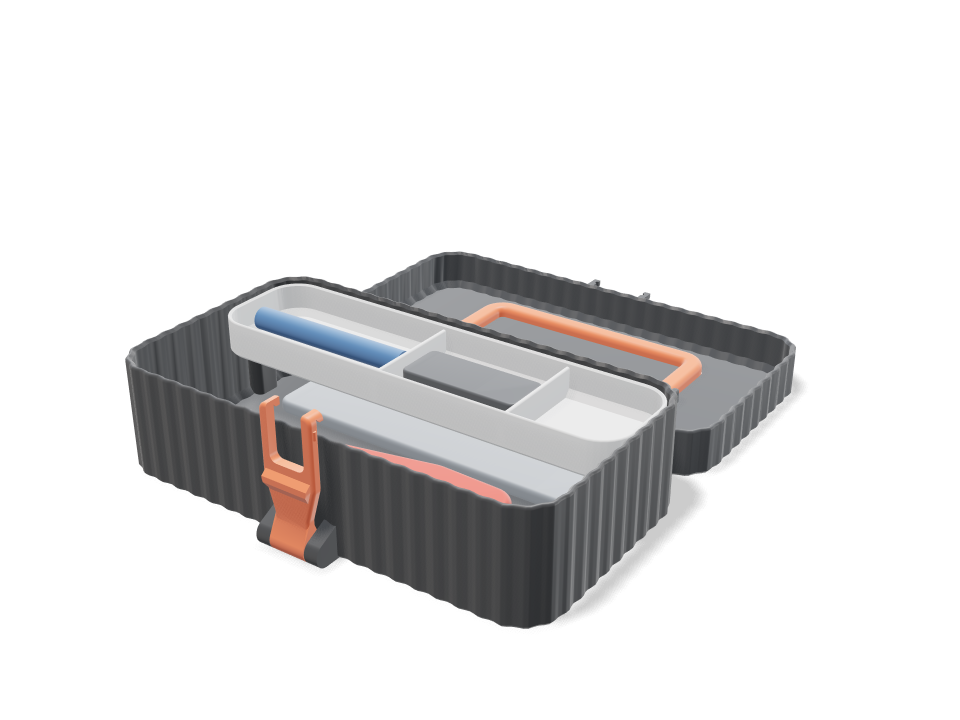
溝模様のツールボックスが、組み上がった状態でベッドから外れます。本体は立てて、ふたはその後ろに逆さまにプリントされ、ピン入りナックルのヒンジでつながっているので、接着もネジ留めも不要です。オレンジのラッチは箱の下部で自分のピンを軸に跳ね上がり、ふたの突起に引っかかって、弾力のある2本の爪がふたの側面にパチッとはまります。取っ手はふたの上面に自分のピンで平らに収まり、持ち運ぶときに起こせます。別パーツの取り外しトレイには、ノズル用の針と六角レンチをニッパーとスクレーパーの上に収納できます。チェックでは、プリントされる各ボディが動作すき間をもって独立していること、2つの動き(閉めてラッチを掛ける、取っ手を起こす)がすべてのサンプル姿勢で干渉しないこと、ふたを閉めた状態で工具が収まること、爪のスナップがPLAの破断ひずみの4分の1未満に収まること、ラッチ・ヒンジ・取っ手が衝撃込みで満載の箱を支えられることを確認しています。
Ask for the sizes you want to tweak, e.g. “make the width adjustable”.
デフォルトサイズでの仕様
Bambu Lab A1でplaを使った実際のビルドから計測。上のスライダーを動かすと、すべての数値がリアルタイムで更新されます。
- 全体サイズ
- 200 × 246 × 60 mm
- パーツ数
- 5
- フィラメント
- 225 g
- プリント時間
- 5 h 28 min
- プレート数
- 2
- サポート
- 不要
工学チェック
チェック名とパラメーター名はCADエンジンから直接出力されるため、英語で表示されます。
- Printed-in-place bodies stand freetotal overlap 0.000 mm³ between base, open lid, latch and handle as printed
- Open lid lands on the bedlid outer face at z = 0.00 mm, handle flush in its slot
- Closed lid seats on the rim0.3 mm above the rim when shut; hinge and latch cheeks locate it; overlap 0.000 mm³
- Hinge knuckle wall1.90 mm around a 4.4 mm pin, 0.4 mm radial gap, 0.4 mm axial gaps
- Latch sits clear when shutoverlap 0.000 mm³ with the closed lid
- Hook holds the lid downlip land bears on the lug over 2.0 mm; lifting the lid 1 mm runs the lug into the lip (11 mm³)
- Snap tines flex safely0.75 % peak strain at 0.5 mm flex (20 mm tine, 4.0 mm wide); PLA breaks at 4 %, kept under a quarter for repeated snaps
- Snap feel24 N squeeze to pass the cheeks (both tines): a deliberate thumb push
- Latch lip carries the base0.7 MPa bending at the lip root, 7 N (half of 0.67 kg, x2 for a bump); PLA allows 16.7
- Latch pivot pin0.2 MPa shear, 0.1 MPa bearing on the 4.4 mm pin
- Hinge pin0.1 MPa shear, 0.0 MPa bearing per lid knuckle
- Handle grip carries the box5.5 MPa at mid-grip for 0.75 kg x2; printed flat so it bends along the layers; allows 16.7
- Handle pivots0.8 MPa shear, 0.5 MPa bearing on each 3.5 mm pin
- Fits: flush cuttersoverlap 0.00 mm³ with base, tray and the closed lid
- Fits: scraperoverlap 0.00 mm³ with base, tray and the closed lid
- Fits: nozzle needle caseoverlap 0.00 mm³ with base, tray and the closed lid
- Fits: hex keysoverlap 0.00 mm³ with base, tray and the closed lid
- A hand fits under the raised handle85 x 30 mm grip envelope between the arms, 31.5 mm clear under the grip, 101 mm between the arms
- Handle swings clear of the lidworst overlap 0.000 mm³ over 0-90 degrees about its pins (0.5 mm slot gap, 0.4 mm pin gap)
- Fits the A1 bed in one print200 x 246 mm printed open (256 mm bed)
- Latch detent is real and clearsswung out 30 deg it clears the closing lid; back at 6 deg the bumps just meet the cheeks (0.00 mm³); at 2.5 deg the rigid bumps overlap the cheeks by 1.6 mm³, the 0.5 mm the tines must flex to snap home
- toolbox stays together after printingall 4 bodies are captive: none can be pulled out along any axis
- toolbox is held firmlyevery captive body is held by at least 0.8 mm (two perimeters)
- flush cutters goes in40 poses along its path clear of every part.
- scraper goes in63 poses along its path clear of every part.
- nozzle needle case goes in30 poses along its path clear of every part.
- hex keys goes in30 poses along its path clear of every part.
調整できる寸法
| 設定 | 初期値 | 範囲 |
|---|---|---|
| Length | 200 mm | 170–240 mm |
| Depth (front to back) | 108 mm | 90–110 mm |
| Closed height | 70 mm | 56–85 mm |
| Hinge radial gap | 0.4 mm | 0.3–0.6 mm |
| Wall | 2.4 mm | 1.8–3.2 mm |
| Lift-out tray | オン | オン / オフ |
パーツリスト
| パーツ | 数量 | サイズ(mm) | フィラメント | 時間 |
|---|---|---|---|---|
| base | 1 | 200 × 129 × 49 | 109 g | 2 h 30 min |
| lid | 1 | 200 × 126 × 40 | 72 g | 1 h 41 min |
| latch | 1 | 26 × 11 × 60 | 3 g | 14 min |
| handle | 1 | 119 × 49 × 8 | 7 g | 14 min |
| tray | 1 | 192 × 49 × 16 | 33 g | 49 min |
作り方
- 長さ・奥行き・高さを手持ちの工具に合わせて設定します。デフォルトでは125 mmのニッパー、150 mmのスクレーパー、針ケース、六角レンチセットが入ります。
- 箱はレイアウトどおり(本体は立てて、ふたは後ろに伏せて)ひとつのオブジェクトとして、PLAかPETGでサポートなしでプリントします。トレイは別にプリントします。
- 外します:ふたとラッチを手でゆっくり動かしてスムーズに動くようにし、取っ手を溝から持ち上げます。
- ふたを閉め、ラッチを跳ね上げて上部を押し込み、爪が側面にカチッとはまれば完了。持ち運ぶときは取っ手を起こします。
プリントのコツ
- プリンターが熱めだったり1層目がつぶれやすい場合は、先にヒンジ隙間テストをプリントしましょう。パーツが溶着するならヒンジの半径方向隙間を0.5 mmに上げます。
- ベッド付近のレイヤーを結合させるようなエレファントフット補正の工夫はオフに。ラッチのナックルと取っ手は1層目から始まります。
- PETGのほうがPLAよりラッチの爪のスナップが長持ちします。たまに使うならPLAで十分です。
よくある質問
ネジや接着剤は必要ですか?
いりません。ヒンジ、ラッチ、取っ手はすべて自分のピンで、組み上がった状態でプリントされます。別パーツはトレイだけで、入れるだけです。
取っ手で持ち運んでもラッチは外れませんか?
持ち運ぶと、本体はヒンジとラッチのリップでぶら下がります。チェックでは約0.7 kgに衝撃を加えても大きな余裕があります。爪のクリック感はラッチを閉じておくための手応えなので、一度工具を入れた状態で試してください。
プリント後にふたやラッチが動かないときは?
ゆっくり前後に動かしてください。溶着したままなら、ヒンジ隙間を少し大きくしてプリントし直します。すべての隙間はこのスライダーに連動して変わります。
カタログにない形が必要ですか? 「テキストからCAD」で、自分の言葉で説明してください
Comments