USB LEDパック用 折りたたみデスクランプ
安価なUSB LEDパックライトを使う、アーキテクト型のデスクランプです。2本バーの下アームとスリムな上アームは平らにたたむことも伸ばすこともでき、ヘッドは傾き、アーム全体はベース上で回るターレットに載って旋回します。各ジョイントは普通のM4ボルトにスプリングワッシャーとナイロックナットを組み合わせたものなので、置いた位置でそのまま止まります。USBケーブルはアームに沿った溝にはめ込み、各ジョイントの周りでループさせて、ベースの下から背面に出します。チェックでは、どの姿勢でもケーブルが太さの5倍より小さく曲がらないこと、各ヒンジがアームを伸ばし切った状態でアームの重さの2倍以上を支えつつ軽く押せば動くこと、ベースに硬貨やワッシャーを入れればランプが立ったままで、倒れる前にアームのほうが動くことを確認しています。
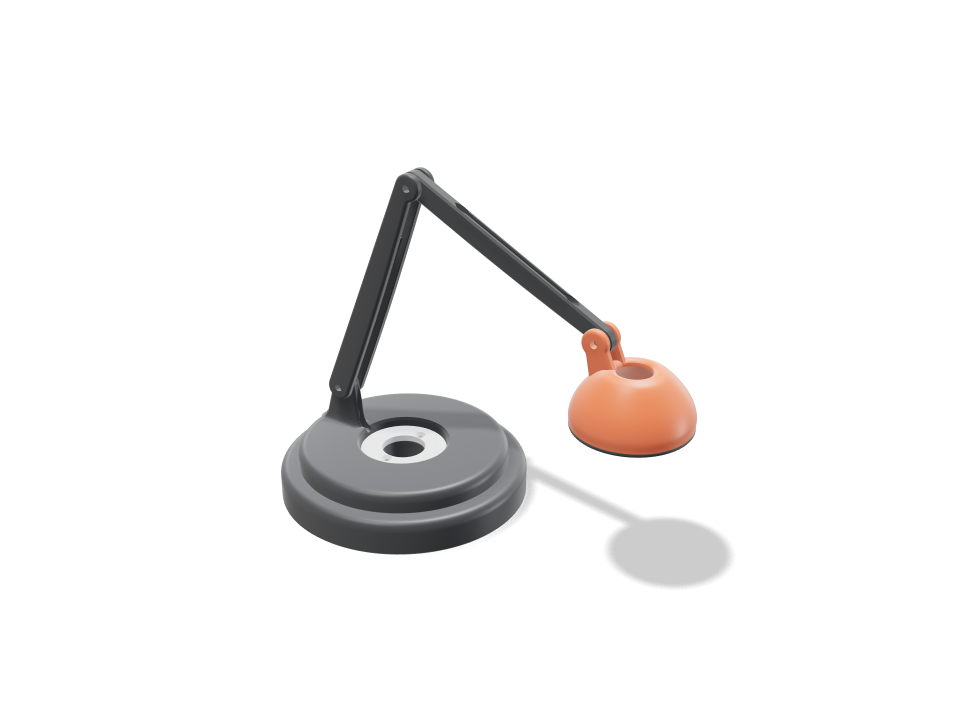
Ask for the sizes you want to tweak, e.g. “make the width adjustable”.
デフォルトサイズでの仕様
Bambu Lab A1でplaを使った実際のビルドから計測。上のスライダーを動かすと、すべての数値がリアルタイムで更新されます。
- 全体サイズ
- 280 × 160 × 220 mm
- パーツ数
- 7
- フィラメント
- 221 g
- プリント時間
- 5 h 31 min
- プレート数
- 2
- サポート
- 一部のパーツで必要
工学チェック
チェック名とパラメーター名はCADエンジンから直接出力されるため、英語で表示されます。
- Lead lies free in its channels in every poseworst overlap 0.00 mm3 over 6 poses
- Lead bends gently in every posetightest bend 17.5 mm = 5.0x the 3.5 mm lead (folded 17.5, rest 17.5, reaching 17.5, rest, head up 75 deg 17.5, reaching, head up 17.5, folded, head up 17.5)
- Fixed run bends gently14.0 mm (4.0x) down the ear, across the turret axis and under the base, where the lead never flexes
- Lead slides to follow the armthe arm run changes 52 mm between poses (373-424 mm); every seat is 1.5 mm wider than the lead and the mouths only stop it falling out, so it slides; leave 80 mm of slack behind the base
- Lead leaves low at the backexits under the base rim at the back, 2.6 mm above the desk
- Puck fits its pocketpocket 60.6 mm for a 60 mm puck; it rests on the 45 degree cone, no contact with the walls
- Puck held by the bezelbezel lip covers 3.0 mm of the puck rim all round; 0.45 mm float between cone and bezel; three M2 screws into heat-set inserts in a 5.6 mm rim
- USB plug threads through the head and the postplug 16.5 x 8.5 mm (18.6 mm across) through a 21 mm apex opening and a 28 mm post bore
- Lead snaps into the arm and stayslower arm: lips leave a 3.0 mm mouth over a 8.4 mm seat; upper arm and ear: a 3.0 mm mouth over a 5.0 mm groove
- Friction hinges hold the arm in every poseshoulder 0.72 N m vs 0.365 N m (x2.0); elbow 0.90 N m vs 0.187 N m (x4.8); head 0.25 N m vs 0.035 N m (x7.2); mu 0.3 PLA on PLA, 6.0 mm mean friction radius, clamp 200/250/70 N
- Moves with a light push3.6 N at the head swings the whole arm at full reach; 4.3 N on the shade rim tilts the head
- Hinge bolts and bores take a knock20 N knock on the head: 0.63 MPa on the 8 mm blade bore, 0.8 MPa shear in the steel M4
- Clamp does not crush the knuckles0.95 MPa on each knuckle face at 200 N; PLA allows 5.0 even across the layers
- Links outlast the hingesat the slipping torque: lower bars 3.4, upper blade 6.1 MPa (along the layers, allow 16.7); ear root 1.5, head cheeks 1.7 MPa (across the layers, allow 5.0); Kt 1.49
- Stays standing at full reachcentre of mass 29 mm from the axis, rim at 79 mm, with 652 g of coins or washers in the pocket (1015 g lamp); takes 2.6 N pressed down on the head to tip; needs at least 45 g of ballast
- Pushing the head down moves the arm before the lamp tipsat full reach the shoulder gives at 1.13 N on the head; tipping needs 2.62 N (x2.3)
- Collar holds the turret downcollar overlaps the turret's ledge by 5.8 mm all round; two M3 into heat-set inserts in the post
- Head tilts its full rangeshade clears the upper arm tilted 75 deg forward (overlap 0.00 mm3)
- USB LED puck goes in20 poses along its path clear of every part.
- ballast: coins or steel washers goes in20 poses along its path clear of every part.
- USB plug through the head goes in30 poses along its path clear of every part.
- USB plug through the post goes in30 poses along its path clear of every part.
- driver: hinge bolts goes in20 poses along its path clear of every part.
- driver: collar screws goes in20 poses along its path clear of every part.
- driver: bezel screws (bench) goes in20 poses along its path clear of every part.
調整できる寸法
| 設定 | 初期値 | 範囲 |
|---|---|---|
| Arm link length | 160 mm | 130–180 mm |
| Base diameter | 160 mm | 160–200 mm |
| Head tilt range | 75 deg | 40–110 deg |
| LED puck diameter | 60 mm | 50–70 mm |
パーツリスト
| パーツ | 数量 | サイズ(mm) | フィラメント | 時間 |
|---|---|---|---|---|
| base | 1 | 160 × 160 × 26 | 102 g | 2 h 19 min |
| turret | 1 | 136 × 136 × 50 | 59 g | 1 h 25 min |
| collar | 1 | 56 × 56 × 4 | 5 g | 11 min |
| lower arm | 1 | 177 × 18 × 17 | 18 g | 30 min |
| upper arm | 1 | 161 × 8 × 17 | 9 g | 18 min |
| head | 1 | 72 × 72 × 54 | 22 g | 38 min |
| bezel | 1 | 72 × 72 × 2 | 4 g | 10 min |
作り方
- アーム長、ベースのサイズ、ヘッドの傾き、パックの直径をスライダーで設定します。チェックはサイズごとに再計算されます。
- 7つのパーツをPLAでプリントし、ヒートセットインサート(ベースの支柱にM3を2個、シェードの縁にM2を3個)を圧入して、ベースのポケットに硬貨か鋼製ワッシャーを詰めます。
- パックのUSBプラグをシェードの穴から上に通してベゼルをネジ留めし、ヘッド、上アーム、下アーム、ターレットをM4 x 25ボルト、スプリングワッシャー、ナイロックナットでつなぎます。
- ケーブルをアームの溝にはめ、プラグを中空の支柱から下に通し、ケーブルをベース下の溝に這わせて、各ナットをジョイントが姿勢を保つまで締めます。
プリントのコツ
- 両アームはまっすぐな背の縁を下にして寝かせてプリントすると、レイヤーがアームに沿って走ります。ボルト穴はサポートなしでプリントできる形になっています。
- シェードは口を下にしてプリントします。内側は45度のコーンなので、こちらもサポート不要です。
- ベースとターレットはインフィル約15%で。重さは樹脂ではなく、硬貨やワッシャーで出します。
よくある質問
どのLEDパックに合いますか?
直径約50〜70 mm、厚さ10 mmで、背面からケーブルが出ている丸いUSBパックライトなら合います。パック直径のスライダーを手持ちのものに合わせてください。
ヒンジのナットはどのくらい締めればいいですか?
軽く締めてから、スプリングワッシャーが少しつぶれるまでさらに約4分の1回転。アームを伸ばし切ったときに垂れるなら、肩のナットをもう少し締めます。
ベースにおもりは必要ですか?
必要です。約650 gの硬貨か鋼製ワッシャーでターレット下のポケットを満たします。これでアームをいっぱいに伸ばしてもランプは倒れません。
カタログにない形が必要ですか? 「テキストからCAD」で、自分の言葉で説明してください
Comments